


,QVWDOODWLRQ
2
→
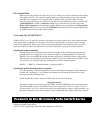
1 mode (For AF-241 and AF-142)
1. Turn the power to all devices to be attached to the Auto Switch.
2. Connect the Bi-tronics Auto Switch to your computer by using a straight through DB-25 male to male
cable.
3. Connect the Bi-tronics Auto Switch to the parallel devices by cables with one DB-25 to C-36 male to male
cable. (See Figure 1)
4. Set the DIP Switch (located on the top of the auto-switch) to 2
→
1 mode with a time out of either 15 or 45
seconds, by setting DIP switches #3 and #4 appropriately (NOTE: The AF-241 does not support 1
→
2
mode.)
5. Turn on your computers and the printer. The four LED’s should flash alternately as the Auto Switch scans
for print jobs.
6. A power adapter is required when the Bi-tronics Auto Switch can not get enough power from the devices
that are attached to it and functions Intermittently.
1
→
2 mode (For use with the AF-142 ONLY)
1. Turn the power to all devices to be attached to the Auto Switch.
2. Connect the Bi-tronics Auto Switch to your computer by using a straight through DB-25 male to male
cable.
3. Connect the Auto Switch to the Parallel devices with cables that have DB-25 male conector on one end and
the appropriate connector for the device being used on the other. (See Figure 2)
4. Set the DIP Switch (located on the top of the auto-switch) to 1
→
2 mode.
5. Turn on your computer and the parallel devices attached to the Auto Switch. The LED A should light as
you select port A
6. A power adapter is required when the Bi-tronics Auto Switch can not get enough power from the devices
that are attached to it and functions Intermittently.
(Note: Port Selection can be done either manually or through the AS Ware program) A power adapter is
required when the Bi-tronics Auto Switch can not get enough power from the devices that are attached to it and
functions Intermittently.