


3. Kit installation (detailed)
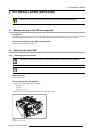
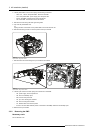
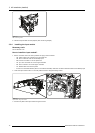
3. Lift the preformatter unit a bit and unplug the following connectors:
- J100, J101, J102 on the preformatter: data from the PMP
- J11 on the preformatter: power supply from the power box
- J410 on the PMP: c omm ands from the local keypad
- J13 on the PMP: commands from the IR receiver
4. Remove the screw fixing the three grounding wires
5. Flip over the preformatter unit
Or,
Unplug the other connectors on the preformatter unit and remove the unit
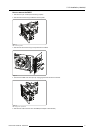
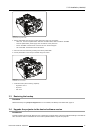
6. Remove both fixing s crews on the front panel of the input module
Image 3-2
Input module: fixing front screws
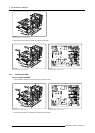
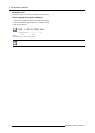
7. Remove the three screws fix ing the input module to the chassis
Image 3-3
Input module: fixi ng screws chasis
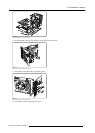
8. Lift the input module a bit and unplug the c onnectors on the PMP:
- J15: power supply from the po wer box
- J19: IC2 to the desktop input
- J23; I2C from the power box
- J14: sync from the engine controller
- J22: I2C to the engine controller
- J11: ethernet wire from the front panel
- J2 and J3 on the LVDS interface (which is mounted on the PMP): data from the desktop input
9. Remove the input module
3.2.2 Removing the PMP
Necessary tools
Torx screwd river T10
8
R59770498 PMP KIT 28/02/2011