


USING YOUR RIPC
19
connection to be made, i.e. if you are working over a private internal network
your NAT (Network Address Translation) firewall settings must be configured
accordingly. In other words, if the RIPC is connected to your local network
environment and your connection to the Internet is over a proxy server only,
failure to configure NAT correctly will make it very unlikely that the Remote
Access will be able to establish the connection. This is because web proxies
are not capable of relaying the RFB protocol.
If you are unsure about this issue, please consult your network administrator
for an appropriate network environment.
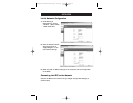
Remote Access window attempts to display the remote screen at its optimal
size, so that it may resize to match the remote screen initially, as well as
following a change of the remote screen’s resolution. You can always resize the
Remote Access window using your local window system.
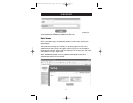
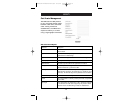
A control bar on the lower part of the Remote Access window houses a control
bar that displays Remote Access status and lets you adjust its settings. The
following table defines the Remote Access control options:
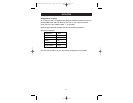
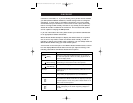
Control Description
Options Allows you to scale down the Remote Access. You can still use
Scaling the mouse and keyboard, however, the scaling algorithm will not
preserve all display details.
Options The submenu for mouse handling offers two options for
Mouse Handling synchronizing the local and the remote mouse pointers.
Options Opens a panel for changing the RIPC’s video settings.
Video Settings
Hot Keys Special button keys to send the defined key combinations to the
remote system.
KVM Keys If defined in KVM Port Settings, you can switch the current KVM
port by sending the appropriate hot key to the KVM switch.
Read Option Toggles the read-only mode on and off. If the Monitor mode check
box is selected, the Remote Access will not accept any local input
for either keyboard or mouse. The symbol indicates whether or not
monitor mode is currently active.
Auto Adjust Starts the auto adjustment procedure to determine the settings
for best visual quality of the current image being displayed on
the RIPC.
P74238-A-F1DE101G-man.qxd 4/10/03 4:25 PM Page 19