


60
GLOSSARY
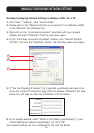
Assuming the time-out is set to 10 minutes, then 10 minutes after you leave, the
login session will expire. You will have to login to the Router again to make any
more changes. The login time-out option is for security purposes and the default
is set to 10 minutes. Note, only one computer can be logged into the Router’s
advanced setup interface at a time.
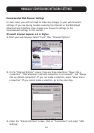
Time and Time Zone
The Router keeps time by connecting to a Simple Network Time Protocol (SNTP)
server. This allows the Router to synchronize the system clock to the global
Internet. The synchronized clock in the Router is used to record the security log
and control client filtering. Select the time zone that you reside in. If you reside
in an area that observes daylight saving time, then place a check mark in the box
next to “Enable Daylight Saving”. The system clock may not update immediately.
Allow at least 15 minutes for the Router to contact the timeservers on the
Internet and get a response. You cannot set the clock yourself.
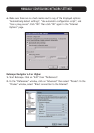
Remote Management
Before you enable this function, MAKE SURE YOU HAVE SET THE
ADMINISTRATOR PASSWORD. Remote management allows you to make changes
to your Router’s settings from anywhere on the Internet.
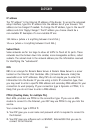
UPnP
UPnP (Universal Plug-and-Play) is a technology that offers seamless operation of
voice messaging, video messaging, games, and other applications that are UPnP-
compliant. Some applications require the Router's firewall to be configured in a
specific way to operate properly. This usually requires opening TCP and UDP ports
and in some instances setting trigger ports. An application that is UPnP-
compliant has the ability to communicate with the Router, basically “telling” the
Router which way it needs the firewall configured. The Router ships with the
UPnP feature disabled. If you are using any applications that are UPnP-
compliant, and wish to take advantage of the UPnP features, you can enable the
UPnP feature. Simply select “Enable” in the “UPnP Enabling” section of the
Utilities page. Click “Apply Changes” to save the change.