


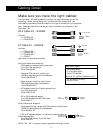

Hardware Installation (continued)
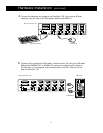
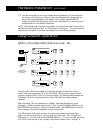
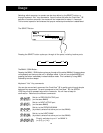
6. Connect the first computer's mouse cable to the OmniView
™
SE. If using a PS/2
cable (Belkin Part# F2N036-XX), connect one end to the PS/2 mouse port on the
computer, and the other end to the PC1 PS/2 mouse port on the back of the
OmniView
™
SE. If using a serial mouse cable (Belkin Part# F2N209-XX-T), connect
one end to a DB9 serial port on the computer, and the other end to the PC1 DB9
serial mouse port on the back of the OmniView
™
SE.
F2N209-XX-T for serial mouse
OR
F2N036-XX for PS/2 mouse
Back of OmniView
™
SE
Back of PC
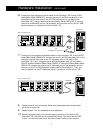
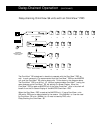
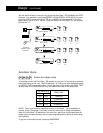
7. Connect the first computer's keyboard cable to the OmniView
™
SE. If using a PS/2
cable (Belkin Part# F2N036-XX), connect one end to the PS/2 keyboard port on the
computer, and the other end to the PC1 keyboard port on the back of the
OmniView
™
SE. If your computer has an AT-style keyboard port, you will need a
PS/2-AT keyboard adapter (Belkin Part# F2N018). If using an AT-cable (Belkin Part#
F3A510-XX), connect one end to the AT keyboard port on the computer, and the
other end to an AT to PS/2 keyboard adapter (Belkin Part# F2N017). Then, con-
nect the adapter to the PC1 keyboard port on the back of the OmniView
™
SE.
F2N036-XX
Back of OmniView
™
SE
Back of PC
8. Double check all the connections. Make sure the keyboard and mouse cables
go to the correct ports.
9. Repeat steps 5-7 for the remainder of the computers.
10. Attach the power supply to the power supply connector at the back of the
OmniView
™
SE. Plug this into any available AC outlet. You should see the LED
or Port 1 on the front panel blink, and hear a beep. Power up your monitor.
7