


21
Using the projector
English
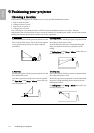
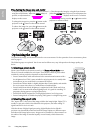
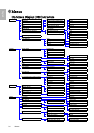
You can change the projected image ratio (no matter what aspect the source is) by using the Aspect buttons on
the remote control or in the Display > Aspect Ratio OSD menu. Select an aspect ratio to suit the format of the
video signal and your display requirements. There are five aspect ratios available:
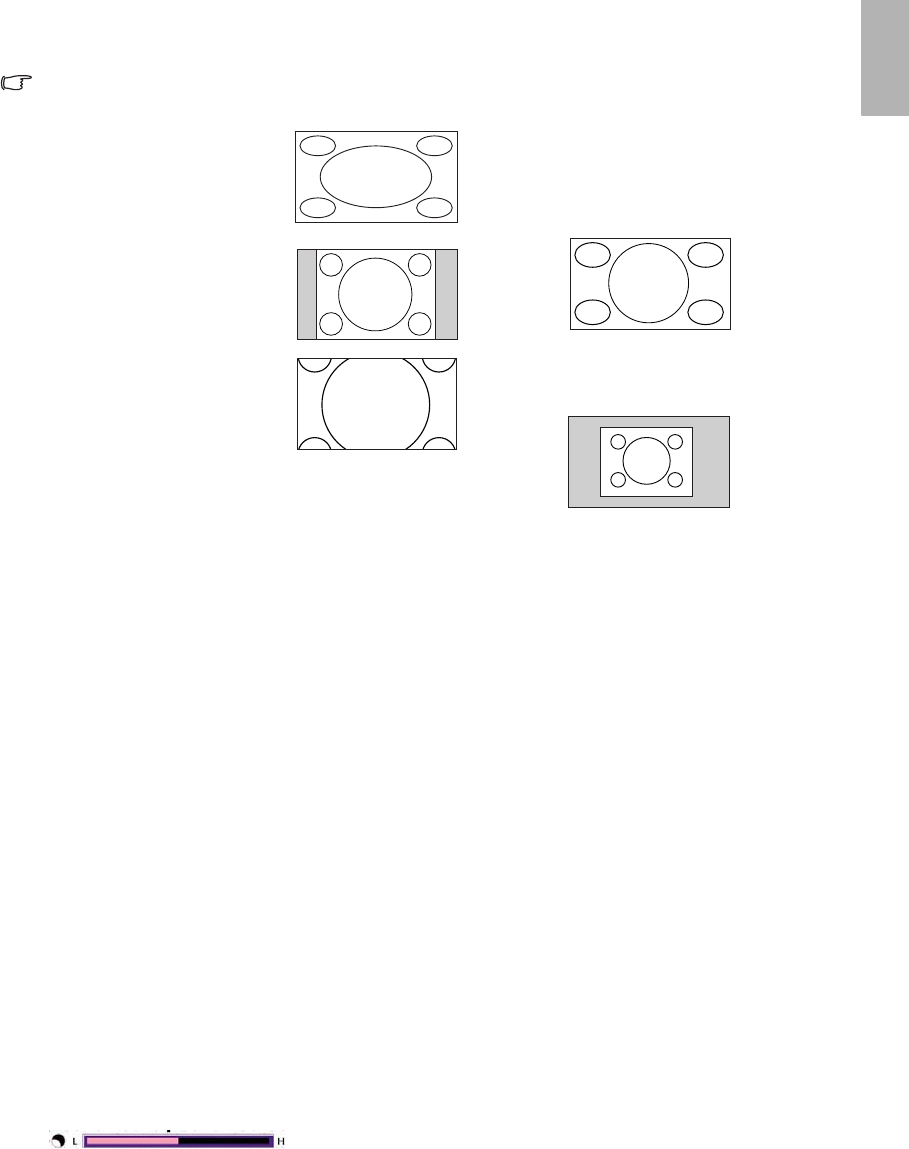
The pictures below are presented on the assumption that the original input source is with 4:3 aspect ratio.
The black portions are inactive areas and the white portions are active areas.
The Anamorphic setting stretches and resizes linearly, except that it treats the vertical and horizontal
dimensions independently. It stretches the height of the source image until it reaches the full projected height,
and stretches the width of the source image until it reaches the full projected width. This may alter the projected
aspect, depending upon the original aspect of the source image. Anamorphic is most suitable for images which
are already in a 16:9 aspect, like high definition TV, as it displays them without aspect alteration.
The 4:3 setting is most suitable for 4:3 images like standard definition TV and 4:3 aspect DVD movies, as it
displays them without aspect alteration.
The Letter Box setting resizes an image proportionately both vertically and horizontally to the width of a 16:9
aspect and centers it onscreen. This produces an image greater in height than can be displayed, so part of the
image is lost (not displayed) along the top and bottom edges of the projection. This is suitable for the display of
movies which are presented in letterbox format (with black bars top and bottom).
The Wide setting stretches the image horizontally in a non-linear manner, that is, the edges of the image are
stretched more than the centre of the image, to prevent distortion of the central part of the image. This is
suitable for occasions where you want to stretch the width of a 4:3 aspect image to the width of a 16:9 aspect
screen. It does not alter the height. Some widescreen movies have been produced with their width squashed
down to the width of a 4:3 aspect, and are best viewed when restretched back to their original width using the
Wide setting.
The Real setting displays the image in a one-to-one pixel mapping without alteration or resize in the centre of
the projection. This is most suitable for use with PC and RGBHD source inputs.
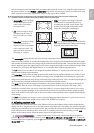
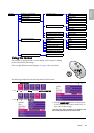
3. Adjusting contrast ratio
The contrast ratio is the measurement of the difference between the brightest whites and the darkest blacks a
display can show. This projector has a very high contrast ratio which can reveal subtle color detail not possible
with projectors which have a lower contrast ratio. You can adjust the contrast level to allow for ambient lighting
levels within the room which may affect color detail. To manually adjust the contrast ratio, press the IRIS
button on the remote control. When the button is pressed, an adjustment bar
" " displays on the screen. To lower the contrast and increase brightness,
press the e button on the remote control or in the Advanced --> Advanced - 20 step IRIS menu. To raise the
contrast and decrease brightness, press the f button on the remote control or in the Advanced --> Advanced -
20 step IRIS menu.
1. Anamorphic: Scales an image
so that it is displayed in the
center of the screen with a
16:9 aspect ratio.
2. 4:3: Scales an image so that it
is displayed in the center of
the screen with a 4:3 aspect
ratio.
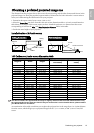
3. Letter Box: Enlarges an image
with letterbox format to
display it in full-screen format
with a 16:9 aspect ratio. The
upper and lower portions of
the image are cropped.
4. Wide: A 4:3 aspect ratio image is enlarged
NON-linearly in horizontal direction to
accommodate 16:9 full-screen display. This
stretches only the right and left sides of the
image; the central part is unchanged.
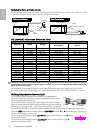
5. Real: One-to-one mapping is performed on the
input signal without any scaling with the image
displayed at the center of the screen.