


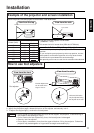

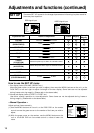

Please basically use liquid crystal projector at the horizontal
position.
If you use liquid crystal projector by the lens up position, the lens
down position and the side up position, this may cause the heat
inside to build up and become the cause of damage.
Be especially careful not to install it with ventilation holes blocked.
a
11
ENGLISH
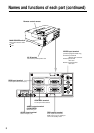
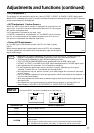
Determine picture size and projection distance as illustrated below.
a:Distance from the projector to the screen.
(tolerance : ±10%)
This screen size is full-screen size.(1024 dots X 768 dots)
Screen
Installation
View from the top
View from the side
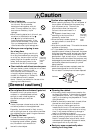
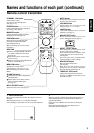
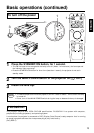
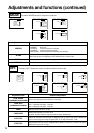
Adjust the projection position using the foot adjusters at the bottom of the projector.
View from the front
• Do not unlock the foot adjusters while you do not support the projector, to avoid falling of
the projector and causing an injury.
• Do not revolve the foot adjusters by force, the foot adjusters is damaged.
• Securely lock the adjuster.
• Do not apply unnecessary force from the upper side when lifting the projector. Otherwise,
projector may be damaged or a finger could be caught and cause injury.
1. Lift up the projector and press the button of the adjuster to release the lock.
2. Adjust the projection angle, release the button of the adjuster and securely lock it.
3. To adjust the angle slightly, revolve the foot adjusters.
Foot adjuster
Lens center
View from the side
Vertical adjustments
can be made in the
range of 0 to 9°.
Installation of liquid crystal projector
Caution
Example of the projector and screen installation
How to use foot adjusters
Screen (inch)
a (inch)
Minimum Maximum
40 64 84
60 97 127
80 130 169
100 163 213
120 196 256
150 244 319
200 326
Horizontal inclination
may be adjusted using
the adjuster at the rear.