


Chapter 3: Local Management
3-20 WPIM-RT1 User’s Guide
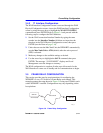
3.5.2 Frame Relay Interface Configuration
Access the WAN Interface Configuration screen through the WAN
Physical Configuration screen, by using the arrow keys to highlight the
WAN INT CONFIG command, then press ENTER. Proceed with the
following steps to configure the WAN Interface.
1. Set the Interface Number that is being used for the WAN connection
by typing the same number into the Interface Number field that was
input into the timeslots in the WAN Physical Configuration screen,
then press ENTER (see the Notes on page 3-19). For Frame Relay
PtoP: The interfaces are assigned when DLCIs are created (in this case
a zero needs to be entered in this field).
2. Use the arrow keys to highlight FR LMI. Press the SPACE bar to
select ANSI_94, T1.617-D or Q.933-A, then press ENTER.
3. Make any changes to the available settings as desired.
4. Use the arrow keys to highlight SAVE, then press ENTER. The
message “SAVE DONE!” displays and Local Management saves the
changes to memory.
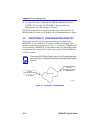
In FR PtoP, the DLCIs must be entered statically, as they will not come up
dynamically as in FR PtoMP.
In FR PtoMP, there is an option to statically enter the DLCIs in
association with a Protocol Manager, the physical port and MIB II, using
the DLCI field in the Interface screen. If the DLCI is not static, it will be
deleted if the Frame Relay switch determines that the DLCI has been
eliminated. If the Frame Relay switch previously reported status on a
DLCI, when it does not report the status of the DLCI, the DLCI and its
associated information is deleted from the platform. Static entries are
never deleted automatically. They must be deliberately deleted by the
user. To enter a DLCI, it is set to “Inactive” and saved, but to delete a
DLCI, it must be accessed and entered as “Invalid” and saved.
NOTE
The choice NO LMI under FR LMI is a test mode only and
should not be used in a practical application.