


6
. Introduction
Top Features
MENU
BACK
KEYSTONE
WARNING
P
O
W
E
R
AUTO PC
INPUT
VOL
-
VOL
+
LAMP
3
4
1
5 8
9
2
10
6
7
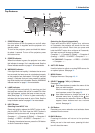
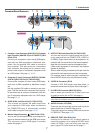
. POWER Button ( )
Use this button to turn the power on and off when
the main power is supplied and the projector is in
standby mode.
To turn on the projector, press and hold this button
for about 1 second. To turn off the projector, press
this button twice.
2. POWER Indicator
When this indicator is green, the projector is on; when
this indicator is orange, it is in standby mode. See the
Power Indicator section on page 61 for more details.
3. WARNING Indicator
If this light blinks red rapidly, it indicates that an error
has occurred, the lamp cover is not attached properly
or the projector has overheated. If this light remains
orange, it indicates that you have pressed a cabinet
key while the Key lock is enabled. See the WARNING
Indicator section on page 61 for more details.
. LAMP Indicator
If this light blinks red rapidly, it's warning you that
the lamp has reached the end of its usable life. After
this light appears, replace the lamp as soon as pos-
sible (See page 58). If this is lit green continually, it
indicates that the lamp mode is set to Quiet. See the
Lamp Indicator section on page 61 for more details.
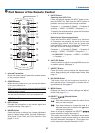
5. INPUT Button
SelectingfromINPUTList
Press and quickly release the INPUT button to dis-
play the INPUT list. Each time the INPUT button is
pressed, the input source will change as follows:
Computer 1* → Computer 2 (Digital)* → Computer 2
(Analog)* → VIDEO → S-VIDEO → Computer 1* → ...
To display the selected source, press the OK button
or allow 2 seconds to elapse.
DetectingtheSignalAutomatically
Press and hold the INPUT button for a minimum
of 2 seconds, the projector will search for the next
available input source. Each time you press and
hold the INPUT button for a minimum of 2 seconds,
the input source will change as follows:
Computer 1* → Computer 2 (Digital)* → Computer 2
(Analog)* → VIDEO → S-VIDEO → Computer 1* → ...
*
LV-7260/LV-X7: Computer → VIDEO → S-VIDEO
→ Computer → ...
6. AUTO PC Button
Use this button to adjust an analog RGB source for
an optimal picture. See page 31.
7. MENU Button
Displays the menu. See page 40, 41.
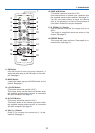
8. SELECT
/ VOL (+/–) Buttons
See page 40.
: Use these buttons to select the menu of the
item you wish to adjust.
When no menus appear, these buttons work
as a keystone control. See page 29.
: Use these buttons to change the level of a
selected menu item. A press of the but-
ton executes the selection. When no menus
appear, these buttons work as a volume
control. See page 31.
9. OK Button
Executes your menu selection and activates items
selected from the menu.
0. BACK Button
Pressing this button will return to the previous
menu.
While you are in the main menu, pressing this but-
ton will close the menu.