


ENG-14
10° 10°
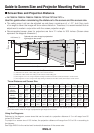
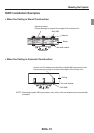
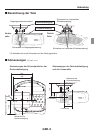
■ Distortion Adjustment
Before the Adjustment
• Refertotheuser’smanualoftheprojector,switchonthepowerandprojectanimage.
• Refertothesection“ImageflipH/V”ofSetupandselecttheprojectionorientation.
• Select“Ceilingmounted”whenprojectionisfromthefrontside,and“Rear,Ceiling
mounted”whenprojectionisfromtherearside.
• Provisionallydeterminetheprojectionsizewiththemanualzoom,thenperformthe
angle adjustment.
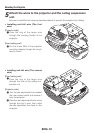
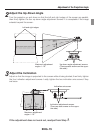
Left-rightangleadjustmentscrews
(Therearealsoscrewsonthe
oppositeside.)
Maximumadjustment
angle+/−10°
1
Adjust the Left-Right Angle
Turntheprojectorleftandrightsothat
theupperandloweredgesofthescreen
areparallel,thenfirmlytightenthefour
left-rightangleadjustmentscrews.Itis
acceptableiftheimageextendsbeyond
thescreen.
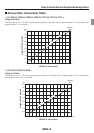
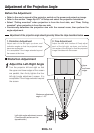
1. Distortion Adjustment
Adjusteachoftheleft-right,up-down,and
inclinationanglessothattheprojectedimage
becomesrectangular.
Itisacceptableiftheimageextendsbeyond
thescreenatthistime.
2. Fine Adjustment
AdjustthelensshiftfunctionofFinelyadjust
eachoftheleft-right,up-down,andinclina-
tionanglesofthefittingssothattheprojected
imagecoincideswiththescreen.
Adjustment of the projection angle should generally follow the steps described below.
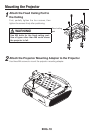
Adjustment of the Projection Angle
Upper
andlower
edges