


Chapter 2 Installation
M15-155 Installation Guide 7
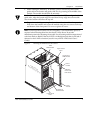
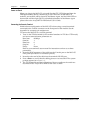
• While holding the module by its handles, place it onto the top and bottom
guide rails in the chassis and gently slide it in by pressing in the middle of the
module. The module should slide in smoothly.
Caution: Ensure that the metal edges of the card (not the PCB) are aligned with the
guide rails. Align the bottom edge first and then the top edge since the module
slots in the bottom rail before the top rail.
• Plug in the module by pressing firmly on the mid-section of the front panel.
Fold down the handles and secure the module using the two screws at the top
and bottom of the front panel. Do not over-tighten the screws.
Note: Even though the modules are hot-swappable, a self initialization period is
required when inserting them into the chassis. Allow about 30 seconds
initialization time after inserting the module for self testing and decompression of
code from Flash to RAM. If the local LECS is in Resilient mode then it will take 2
minutes for the LANE to function (see the Avaya M770 ATM Switch User’s
Guide).
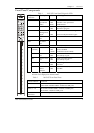
Figure 3 Inserting the Module into the Chassis
Avaya M770
Multifunction Switch
DomainX
Motherboard
ATM
Motherboard
Lower Guide
Rails
Upper Guide
Rails
DomainX or
ATM Module
Plastic
Handle
Plastic
Handle
Module
Name and
LEDs Panel