


20020601
English
1-2
Supported Calculator Models
Connection to a supported scientific calculator is essential if you want to get the most out of
your EA-200. A connected Graphic Scientific Calculator sends commands that control the
EA-200 during transfer of sampled data and other operations. Transferred data can be
graphed on the calculator. For details about commands, see “Using Commands” on page
1-3, and “Command Tables” on page α-1-1.
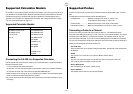
Supported Calculator Models
ALGEBRA FX Series CFX-9850/fx-7400 Series
ALGEBRA FX 2.0 PLUS
CFX-9950GB PLUS
ALGEBRA FX 2.0
CFX-9850GB PLUS
FX 1.0 PLUS
CFX-9850Ga PLUS
FX 1.0
CFX-9850G PLUS
CFX-9970G
fx-9750G PLUS
CFX-9950G
CFX-9850G
fx-7400G PLUS
fx-7450G
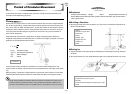
Supported Probes
A probe is a sensor that connects to the EA-200 for sampling temperature, light, and other
data.
The EA-200 comes with the three probes described below.
• Voltage Probe...................Measures voltage in the range of –10V to +10V.
CH3 measures in the range of –5V to +5V.
• Optical Probe ...................Measures luminance in the range of 100 to 999.
• Temperature Probe ..........Measures temperature in the range of –20°C to 130°C.
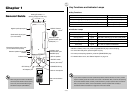
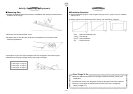
Connecting a Probe to a Channel
A probe connects to an input/output port called a “channel.” The EA-200 has seven
channels: three analog channels (CH1, CH2, CH3), one sonic channel (SONIC), one digital
input/output channel (DIG I/O), a microphone channel, and a speaker channel. You can
connect probes individually, or you can connect multiple probes for simultaneous sampling.
You can use commands to configure the settings for the channel being used for sampling, to
specify how sampled data should be handled, etc.
CH1, CH2, CH3
These channels are for the probes (voltage, temperature, optical) that come bundled with
the EA-200.
SONIC
This channel is for connection of an optional “Motion Sensor (EA-2)”.
DIG I/O
This port is for input and output of an 8-bit binary signal in the range of 0V to 5V.
This could be used, for example, to light an LED.
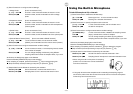
Built-in Microphone
The microphone can be used to sample sound.
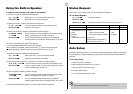
Built-in Speaker
The speaker can be used to output sound samples.
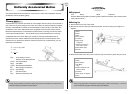
Connecting the EA-200 to a Supported Calculator
Use the special data communication cable to connect the EA-200 to a supported Graphic
Scientific Calculator model.
(1) Turn off the EA-200 and the calculator.
(2) Connect one end of the special data communication cable to the scientific calculator.
(3) Connect the other end of the cable to the EA-200’s MASTER port.
• Insert the plugs as far as they will go. If you experience problems when transferring data,
check to make sure that both plugs are fully inserted.
• Be sure to read the user documentation that comes with the scientific calculator you are
connecting.