


40
To connect the document camera to the Data Projector and project the
image of a document
1.
Turn on the Data Projector.
Wait until the Data Projector’s POWER/STANDBY indicator is lit green.
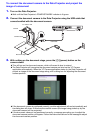
2.
Connect the document camera to the Data Projector using the USB cable that
comes bundled with the document camera.
3.
With nothing on the document stage, press the [P] (power) button on the
camera stand.
This will turn on the document camera, which will cause its lens to extend.
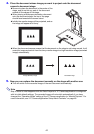
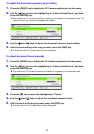
The Data Projector will recognize the document camera and start up the YC Camera
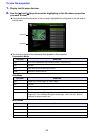
application automatically. When the YC Camera application starts up, the Data Projector will
project an image of the document stage along with a dialog box for adjusting the document
camera position.
If the document camera is positioned correctly, position adjustment will end automatically and
the dialog box will close. At this time the monitor screen (the image being picked up by the
document camera) will be projected.
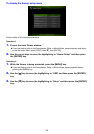
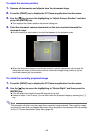
If the document camera is not positioned correctly, a message prompting you to adjust the
document camera position will appear. Follow the instructions shown in the message to adjust
the document camera position.
Document stage
YC-400/YC-430
Camera
Camera stand
USB cable