


2-1
2
Installing the Router
This chapter provides step-by-step instructions for installing the router.
You must take many factors into consideration while planning the router installation. Due
to the versatility of the router and the diversity of available host platforms, host bus
adapters (HBAs), switches, hubs, storage devices, and applications, only general
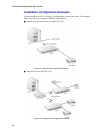
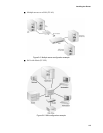
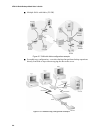
guidelines are found in this Guide. For examples of the most common configurations, see
Installation Configuration Examples on page 2-4.
You can mount the router in a standard 19" rack or place it on a table or desktop. Be sure
the operating environment meets the requirements found in Specifications on page 1-4.
To install the router, you need to complete the following tasks in sequence:
1 Unpack the router. See page 2-1.
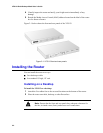
2 Install the router. See page 2-2
3 Connect the router. See page 2-7.
4 Power up all devices. See page 2-10.
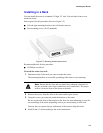
Unpacking the Router
Carefully unpack the router and ensure that you have all the parts specified below:
■ Router
■ Five rubber feet
■ Power cable
■ RS-232 cable
■ User’s Guide
■ Mounting brackets (with 4 Phillips screws that are already screwed into the side of the
router)
To unpack the router:
1 Place the shipping container on a flat, clean, stable surface.
2 Carefully remove the router and verify the contents against the packing list.
3 Remove the foam from the sides of the router and remove it from the plastic bag.
Save the original shipping container and packing materials in case future reshipment
is necessary.