


2-11
Cisco Aironet 1240AG Series Access Point Hardware Installation Guide
OL-8371-05
Chapter 2 Installing the Access Point
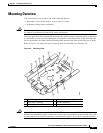
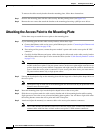
Mounting Above a Suspended Ceiling
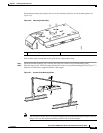
Follow these steps to mount your access point on a suspended ceiling:
Step 1 Decide where you want to mount the access point.
Step 2 Attach two T-rail clips to the suspended ceiling T-rail.
Step 3 Use the mounting plate to adjust the distance between the T-rail clips so that they align with the holes in
the mounting plate.
Step 4 Use a standard screwdriver to tighten the T-rail clip studs in place on the suspended ceiling T-rail. Do
not overtighten.
Step 5 If using recessed ceiling tiles, install a plastic spacer on each T-rail clip stud. The spacer’s legs should
contact the suspended ceiling T-rail.
Step 6 Attach the mounting plate to the T-rail clip studs and start a Keps nut on each stud.
Step 7 Use a wrench or pliers to tighten the Keps nuts. Do not overtighten.
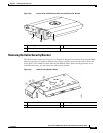
Step 8 To attach the access point to the mounting plate, see the “Attaching the Access Point to the Mounting
Plate” section on page 2-16.
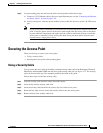
Step 9 If you need additional security, refer to the “Securing the Access Point” section on page 2-17 for
additional information.
Step 10 Verify the access point is operating (see the “Powering Up the Access Point” section on page 2-22).
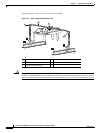
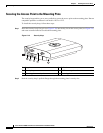
Mounting Above a Suspended Ceiling
The access point mounting plate is designed to be integrated into the T-bar grid above the tiles of a
suspended ceiling. Using a T-bar box hanger and bracket mounting clip (not supplied) such as the
Erico 512A and BHC, you orient the access point antenna just above the top surface of a standard ceiling
tile. You may need to modify a thicker tile to allow room for the antenna.