


3-15
Cisco Aironet 1240AG Series Access Point Hardware Installation Guide
OL-8371-05
Chapter 3 Troubleshooting 1240AG Series Autonomous Access Points
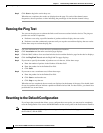
Resetting to the Default Configuration
Using the MODE Button
Follow these steps to delete the current configuration and return all access point settings to the factory
defaults using the MODE button:
Step 1 Disconnect power (the power jack for external power or the Ethernet cable for in-line power) from the
access point.
Step 2 Press and hold the MODE button while you reconnect power to the access point.
Step 3 Hold the MODE button until the Ethernet LED turns an amber color (approximately 2 to 3 seconds), and
release the button.
Step 4 After the access point reboots, you must reconfigure the access point by using the Web browser interface,
the Telnet interface, or Cisco IOS commands.
Note The access point is configured with the factory default values including the IP address (set to
receive an IP address using DHCP).
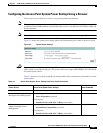
Using the Web Browser Interface
Follow these steps to delete the current configuration and return all access point settings to the factory
defaults using the web browser interface.
Step 1 Open your Internet browser.
Note The access point web-browser interface is fully compatible with Microsoft Internet Explorer
version 6.0 on Windows 98 and 2000 platforms and with Netscape version 7.0 on Windows 98,
Windows 2000, and Solaris platforms.
Note When using the access point browser interface, you should disable your browser pop-up blocker.
Step 2 Enter the access point’s IP address in the browser address line and press Enter. An Enter Network
Password page displays.
Step 3 Enter your username in the User Name field.
Step 4 Enter the access point password in the Password field and press Enter. The Summary Status page
displays.
Step 5 Click System Software and the System Software page displays.
Step 6 Click System Configuration and the System Configuration page displays.