


1-14
Cisco 7401ASR Installation and Configuration Guide
OL-5419-01 B0
Chapter 1 Overview and Parts Installation
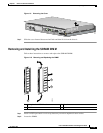
Replacing the SDRAM DIMM
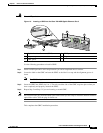
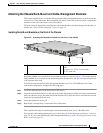
Step 3 Press both spring latches outward to release the DIMM. See Figure 1-10.
Step 4 Gently pull the DIMM free from the DIMM socket, taking care not to touch the pins that insert into the
socket. Place the DIMM in an anti-static bag.
Caution Forcing the DIMM into the socket can damage the DIMM. Use the notches on the DIMM to align the
DIMM with the DIMM socket before inserting it.
Step 5 Locate the notches and align the DIMM with the DIMM socket.
Step 6 Gently insert the new DIMM, taking care not to damage the pins on the edge of the DIMM.
Step 7 Press the spring latches to lock the DIMM in place.
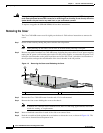
Replacing the Cover
Step 1 Replace the cover; lower it onto the chassis and push the cover toward the rear of the chassis to lock it
in place.
Step 2 Replace and tighten the four cover screws.
Replace the Cisco 7401ASR router in the rack. See Chapter 2, “Rack-Mounting, Tabletop Installation,
and Cabling” for instructions.
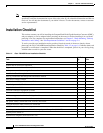
For memory specifications and configurations, see Appendix A, “Specifications” the “Memory
Specifications and Configurations” section on page A-3.