


13
Supervisor Engine 720 Switch Processor and Route Processor Memory Installation Note
78-15538-02
Installing the SP and RP Memory Upgrade Kit
To install the DRAM DIMM upgrade kit, perform these steps:
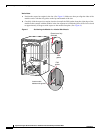
Step 1 Remove the old DRAM DIMM from its socket by pulling the locking spring clips on both sides
outward and tilting the DIMM free of the clips. Be careful not to break the clips on the DIMM
connector.
Step 2 Holding the DIMM by its edges, gently lift to disconnect it from the DIMM socket, and place the
DIMM on an antistatic mat or foam.
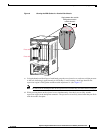
Step 3 Remove the upgrade DIMM from the antistatic package.
Step 4 Hold the DIMM between your thumbs and forefingers, with the connector edge (the metal fingers)
down, and insert the connector edge of the DIMM into the socket connector.
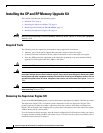
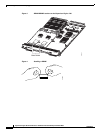
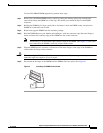
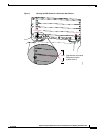
Note A notch (key) is located on the right connector edge of the DIMM. (See Figure 5.) This notch
key ensures that the DIMM is correctly oriented in the socket.
Step 5 Slide the DIMM into the connector so that none of the metal fingers at the edge of the DIMM are
visible under the lining of the connector.
Caution When inserting the DIMM, use firm but not excessive pressure. If you damage a socket, you must
return the supervisor engine to Cisco for repair.
Step 6 Press down on the edges of the DIMM until the DIMM clicks into place. (See Figure 5.)
Figure 5 Installing the DIMM in the Socket
28736