


3-3
Cisco SFS 3012R Multifabric Server Switch Hardware Installation Guide
OL-11187-01
Chapter 3 Installing and Removing Server Switch Field Replaceable Units (FRUs)
Adding or Replacing Ethernet or Fibre Channel Gateways
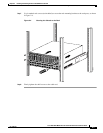
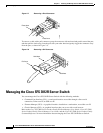
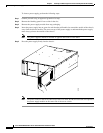
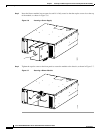
Step 7 Push the ejector lever up until it clicks into place, as shown in Figure 3-2.
Figure 3-2 Closing the Ejector Lever
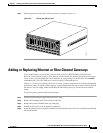
Adding or Replacing Ethernet or Fibre Channel Gateways
You can add, remove, and swap I/O gateways while your Cisco SFS 3012R Server Switch runs.
However, if the software image on your gateway does not match the software image that runs on your
server switch, you must install the correct software on your gateway. For details, refer to the
install
command in the Cisco SFS 7000 Series Product Family Command Reference.
Chapter 4, “Viewing and Updating the Software Image” provides instructions for viewing and updating
the software image. To update a single gateway, use the standard installation procedure, but do not reboot
the chassis. You can simply enable and disable the individual gateway to activate the new software
image.
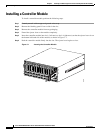
To install a gateway, perform the following steps:
Step 1 Ground yourself using an approved ground wrist strap.
Step 2 Remove the blanking panel if one resides in the slot.
Step 3 Remove the gateway module from any packaging.
Step 4 Extend the ejector lever on the gateway completely.
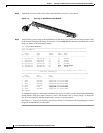
Step 5 Insert the gateway into an expansion module slot such that the ejector lever sits on the bottom-left-hand
side of the module.
180743