


Linux Installation and Configuration Guide for AlphaServer 45
ECG513/0100
Boot the system using the "boot" command. The result should be that the system boots from the
floppy. You will eventually be prompted to replace the BOOT floppy with the RAMDISK floppy.
If during this process you encounter a problem, such as due to a typographic error in the setting of
the SRM parameters, you will probably be stopped with an "aboot>" prompt. The best way to
deal with this situation is to reset the system using the reset button on the front panel. Then using
the SRM commands, correct the mistake, and repeat the "boot" process.
Software Installation
SuSE’s installation program is flexible. While it allows for autodetection of devices and autoload
of device drivers, it allows you to override the automatically configured parameters. Compaq’s
testing this Solutions Guide was performed using SuSE Version 6.1.
The software installation process requires that the system be rebooted at two critical places in the
process. The first time is just after completing the partitioning of the disk, and the second happens
automatically after all of the software components are installed on the disk. Be certain not to skip
the reboot after the disk partition process is completed.
Disk Partitioning
In preparation to partition your disk, you should boot your AlphaServer via the BOOT floppy and
following the process for selecting a language, display color, keyboard type, and installation
media. At this stage, you should select the "Install From Scratch" menu option, and proceed to the
window titled "Partition Hard Drives". At this point, press the ALT+F2 keys, which will change
the display to show a shell-command prompt. At this prompt, type the command "fdisk" followed
by the enter key.
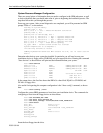
The process of partitioning your boot disk for Linux on your AlphaServer can be somewhat
involved. This section provides an example of how perform the partitioning process using fdisk.
Note, the partition recommendations used in steps 14-27 are based on a RZ1DD-AA disk
geometry. If your disk has a different geometry you will need to use different starting/ending
cylinder numbers for each partition. The correct starting/ending cylinder numbers can be
computed by using these size recommendations and the number of bytes/cylinder for the disk that
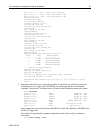
you are using (this figure is reported by fdisk). The disk used for this example is a 4.3GB drive
(DS-RZ1CF) which fdisk shows as having 1023 cylinders:
4 partitions:
# size offset fstype [fsize bsize cpg]
a: 16368 0 boot # (Cyl. 1 - 2)
b: 212784 16368 ext2 # (Cyl. 3 - 28)
c: 4272048 229152 swap # (Cyl. 29 - 550)
d: 3871032 4501200 ext2 # (Cyl. 551 - 1023)
We strongly recommend the following multi-partition layout:
A boot partition – A boot partition is used to reserved the first 2 cylinders (1-2) to write the
bootloader in order to boot the disk from SRM.
A root partition – The root partition is where the / (root directory) resides. Always starts at
cylinder 3. We recommend creating a root partition of 300MB minimum and a maximum of
900MB.
A swap partition – A swap partition is used to support virtual memory. We commend creating a
swap partition of 2 times the computer RAM.