


Linux Installation and Configuration Guide for AlphaServer 47
ECG513/0100
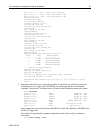
29. Type “t” to change the partitions filesystem id.
30. Type “a” for partition a – boot partitions use a “boot” code.
31. Type “L” to list the codes you can use.
32. Enter “d” for boot type.
33. Type “t” to change the partitions filesystem id.
34. Type “b” for partition b – / (root) partitions use a “ext2” code.
35. Enter “8” for ext2 type.
36. Type “t” to change the partitions filesystem id.
37. Type “c” for partition c – swap partitions use a “swap” code.
38. Enter “1” for swap type.
39. Type “t” to change the partitions filesystem id.
40. Type “d” for partition d – /usr partitions use a “ext2” code.
41. Enter “8” for ext2 type.
42. Type “p” to print the partition table – Please verify all your settings.
43. Type “w” to write the disklabel to the disk.
44. Type “q” to quit.
For further information on creating partitions please refer to the Installation Guide provided by
the software distribution vendor.
At this point, the partitions have been created, and the system must be rebooted. You can reboot
by either pressing the RESET or POWER buttons on the front of the AlphaServer system. Once
the system returns to the SRM prompt, follow the preceeding instructions to return to the
"Partition Hard Drives" window. Select the "Do Not Partition" option at this screen.
You will now be presented a window that allows you to select and format the disk for the
software to be installed, entitled "Creating Filesystems". You should use the F4 key to define the
mount point of "/" for sda2 and “/usr” for sda4. Use the F6 key to select the "Normal"
formatting of the drive for both partitions. Once those steps are complete, press enter to continue.
When the window "Change/Create Configuration" is presented we recommend that you make
certain to select the "aboot" package from the "a: Linux Base System" group, and the "xglint"
package from the "xsrv: X Server Software" group. Ensure that you depress the F10 key after
each selection to add it to the installation. If you forget to select these packages, you will not be
able to boot directly from the hard drive, nor be able to run the X Window System software. Once
these are selected, and you have selected any other software options that you require, begin the
installation. If you encounter a message indicating that the xglint software depends upon other
packages, select "Continue", which will ignore that situation.
Post-Installation
System Resource Manager Configuration
After the software has been loaded to the disk, the system will attempt to reboot. Before it begins
the bootup process, press the front panel reset button. This will stop the bootup process, and allow
you to make the final configuration changes to be able to boot directly from the disk, instead of