Linux Installation and Configuration Guide for AlphaServer 71
ECG513/0100
7. Run the following command from the DOS command shell:
C:\Linux> rawrite
Enter source file name: aboot
Enter destination drive: a
Label this floppy "AlphaStation Linux BOOT Floppy".
8. Run the following command from the DOS command shell:
C:\Linux> rawrite
Enter source file name: install
Enter destination drive: a
9. Label this floppy "AlphaStation Linux RAMDISK Floppy".
With those two floppies in hand, you are now prepared to begin the installation process on your
AlphaStation.
Creating floppies using an UNIX system
To create the BOOT and RAMDISK floppies, you will need to make use of a computer, which
has Internet access. The instructions below detail the process. Note that depending upon what
version of unix and vendor computer you are using to perform this process, some minor
variations in the process may be required. The exact commands shown here are for Digital UNIX,
and should be similar to most other popular UNIX systems.
1. Insert the Linux CD-ROM into the computer, and mount it:
$ mount /cdrom
2. Insert a blank, formatted floppy into the computer, and copy the BOOT kernel to it:
$ dd if=/cdrom/disks/aboot of=/dev/fd0
3. Insert a blank, formatted floppy into the computer, and copy the RAMDISK to it:
$ dd if=/cdrom/disks/install of=/dev/fd0
With those two floppies in hand, and the CD-ROM removed from the computer, you are now
prepared to begin the installation process on your AlphaStation.
Firmware Inspection and Upgrade
After powering up your AlphaStation computer, type the command "show version". Check that
the version string printed is "V5.4-2 May 19 1999 14:25:16" or newer, and that the first letter of
the version string is a "V". If this is not the case, you should upgrade your firmware. Instructions
on how to do this can be found at http://ftp.digital.com/pub/Digital/Alpha/firmware/ along with
the latest firmware images.
System Resource Manager Configuration
There are several pieces of information that you need to configure in the SRM subsystem, as well
as device identifiers that you should make note of, prior to beginning the installation process. The
steps that follow take you through that process.
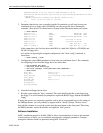
1. Power up your system. After several diagnostics are completed, you will be presented an
SRM prompt ">>>", as shown here:


