


C-6 Changing Audio Card Settings
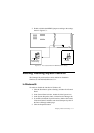
6. To disable the interface, clear the Original Configuration
(Current) check box in the General tabbed page of the
properties sheet.
To enable it, select the check box.
7. Click the OK button and restart Windows 95 for the change to
take effect.
After restarting Windows 95 to effect the interface disabling,
please disregard the information displayed in the Resource
Settings box on the Resources tab of the Properties sheet.
The
only
indicator that your interface has indeed been disabled
is the cleared Original Configuration (Current) check box.
When you re-enable the interface for use by another device,
Windows 95 might warn you that there is a conflicting device
or that the resource area associated with the interface is already
in use. Ignore this warning. The new device should function
perfectly despite the warning.
In MS-DOS/Windows 3.1x
To enable or disable the interface in MS-DOS:
1. Exit to MS-DOS if you are in Windows 3.1x.
2. Change to the directory where your CTCM and CTCU
programs are installed. The default directory is C:\CTCM.
Type
CTCU
and press <Enter>.
3. On the Menu menu of the Creative Plug and Play
Configuration Utility screen, click PnP Cards.
4. In the List of PnP Cards list, click your Creative Plug and Play
card. In the List of Devices list, click Gameport.
5. Click the Resources button.
The current resources assigned to the interface are displayed.
6. To disable the interface, select the Disable check box in the
Resources window.
To enable it, click to clear the check box.
7. Click the OK button twice.
8. On the Menu menu, click Exit. Type the path of your Windows
3.1x directory (for example, C:\Windows) and press <Enter>.
9. Restart your system for the change to take effect.