


CRESTRON
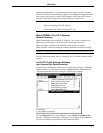
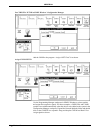
2. Press and hold button 1 on the unit while replacing battery.
3. Replace battery compartment cover and release button 1.
4. Press/release button 2 (binary 0).
5. Press/release button 2.
6. Press/release button 4 (binary 1).
7. Press/release button 2.
8. Press/release button 2.
9. Press/release button 4.
10. Press/release button 2.
11. Press/release button 4.
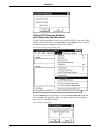
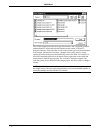
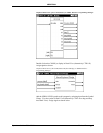
RF ID CODE Conversion Table
HEX BINARY BUTTON
(ALPHANUMERIC DIGIT) CODE PRESS/RELEASE
0 0000 2222
1 0001 2224
2 0010 2242
3 0011 2244
4 0100 2422
5 0101 2424
6 0110 2442
7 0111 2444
8 1000 4222
9 1001 4224
A 1010 4242
B 1011 4244
C 1100 4422
D 1101 4424
E 1110 4442
F 1111 4444
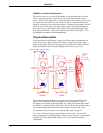
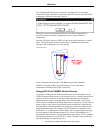
Laser Button Selection via CNWML Button Presses
The following procedures describe how either the center keypad button or button 4
can be assigned to the laser pointer and how to disable the laser pointer.
NOTE: A button that is assigned the laser pointing function does not transmit a
code.
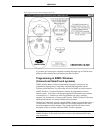
Center Keypad Button
1. Open battery compartment and remove one battery.
2. Press and hold the large center keypad button on the unit while
replacing battery.
3. Release center keypad button and replace battery compartment cover.
The center keypad button is assigned to the laser pointer.
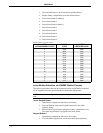
Keypad Button 4
1. Open battery compartment and remove one battery.
2. Press and hold keypad button 4 on the unit while replacing battery.
8 • Wireless Mouse Operations Guide - DOC. 5700A