


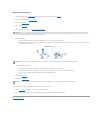
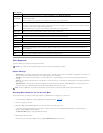
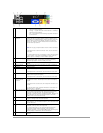
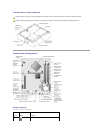


Back View
computer is adequately ventilated. Use only a dry cloth to clean the
vent area to avoid water damage to the computer.
6
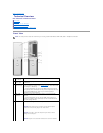
power button
Press this button to turn on the computer.
NOTICE: To avoid losing data, do not use the power button to turn off
the computer. Instead, perform an operating system shutdown.
7
power light
The power light illuminates and blinks or remains solid to indicate
different states:
¡ No light — The computer is turned off.
¡ Steady green — The computer is in a normal operating
state.
¡ Blinking green — The computer is in a power-saving
state.
¡ Blinking or solid amber — See "Power Problems" in your
computer Owner's Manual.
8
front-panel
door release
button
Press this button to access the front-panel connectors.
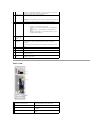
9
microphone
connector
Use the pink microphone connector to attach a personal computer
microphone for voice or musical input into a sound or telephony
program.
On computers with a sound card, the microphone connector is on the
card.
10
headphone
connector
Use the green headphone connector to attach headphones.
11
FlexBay
Use the Flexbay for an optional floppy drive or Media Card Reader.
12
diagnostic lights
For more information on what each diagnostic light means, see
"Diagnostic Lights."
13
front-panel
door
This panel covers the CD/DVD drive and the optional Media Card
Reader or floppy drive.
1
voltage selection switch (may not be
available on all computers)
See the safety instructions in the Product
Information Guide for more information.
2
power connector
Insert the power cable.
3
back panel connectors
Plug USB and other devices into the appropriate
connector.
4
card slots
Access connectors for any installed PCI Express
cards.