


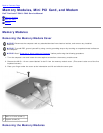

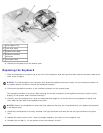

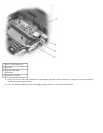


1 boss supports (5)
2 track stick cable
3 keyboard flex cable
4 keyboard interface
connector
5 orientation label
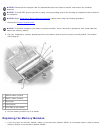
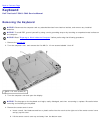
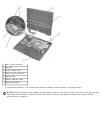
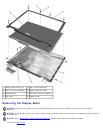
8. Remove the keyboard from the bottom case.
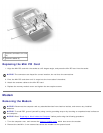
Replacing the Keyboard
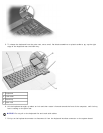
1. Place the keyboard on the palm rest at the front of the computer with the keys face down and the connector toward the
back of the computer.
NOTICE: To avoid damage to the connector pins, press the keyboard connector evenly into the interface connector on
the system board, and do not reverse the keyboard connector.
2. Connect the keyboard connector to the interface connector on the system board.
The keyboard connector may have a label showing the correct orientation of the keyboard connector (relative to the
display) in the system-board interface connector.
3. Carefully turn the keyboard over. Align the keyboard boss supports, fit the left side of the keyboard into place, and
then snap the right side of the keyboard into place.
NOTICE: Position the keyboard flex and track stick cables so that they are not pinched when you replace the keyboard
in the bottom case.
4. Check that the keyboard is correctly installed. The keys should be flush with the left and right surfaces of the palm
rest.
5. Replace the center control cover, close the display assembly, and then turn the computer over.
6. Reinstall the five M2.5 x 12-mm screws in the holes labeled "circle K."