


If The Link Status LEDs Are Not Green
1. Turn off the host server.
2. Reseat the cables on the expansion array and the server.
3. Turn on the expansion arrays and then the storage array and wait until the system is fully booted.
4. Turn on the host server.
5. Check the link status LED. If the link status LED is not green, replace the cables.
If the problem is not resolved, see Getting Help.
Troubleshooting RAID Controller Modules
CAUTION: Many repairs may only be done by a certified service technician. You should only
perform troubleshooting and simple repairs as authorized in your product documentation, or as
directed by the online or telephone service and support team. Damage due to servicing that is
not authorized by Dell is not covered by your warranty. Read and follow the safety instructions
that came with the product.
CAUTION: In the case of non-redundant configurations, it is recommended that you turn off the
host server before turning off the array to prevent loss of data.
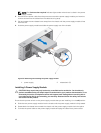
If Both LEDs For Any Given FC IN Port Are Unlit
1. Turn off the host server, storage arrays, and expansion enclosures.
2. Reseat the RAID controller module and reconnect cables on the storage array and the host server.
3. Restart the storage array and wait until the array is fully booted.
4. Turn on the host server.
5. Recheck the LEDs of the affected port(s). Replace the fibre optic cables of any port(s) where both
LEDs are unlit.
NOTE: The SAS OUT status LED must be green.
If the problem is not resolved, see Getting Help.
Troubleshooting Physical Disks
CAUTION: Many repairs may only be done by a certified service technician. You should only
perform troubleshooting and simple repairs as authorized in your product documentation, or as
directed by the online or telephone service and support team. Damage due to servicing that is
not authorized by Dell is not covered by your warranty. Read and follow the safety instructions
that came with the product.
1. Check the storage array profile to ensure that the most current version of the firmware is installed.
For more information, see the Support Matrix at dell.com/support/manuals.
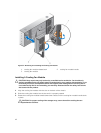
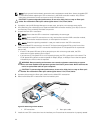
2. Remove the physical disk from the system.
NOTE: You must ensure that you check the physical disk indicators before removing the faulty
physical disk from the system.
3. Check the physical disks and the midplane to ensure that the connectors are not damaged.
47