


202 Adding and Replacing Parts
7
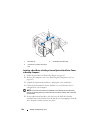
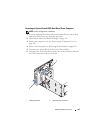
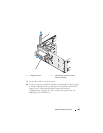
Slide the sliding-plate lever to release the shoulder screw and slide the
drive out of the lower 5.25-inch drive bay.
8
Set the drive aside in a secure location.
Installing an Optional Fourth Hard Drive (Tower Computer)
NOTICE: In a tower configuration with multiple optional drives, there can only be
one floppy drive or Media Card Reader, which must be installed in the lower
3.5-inch drive bay. The third hard drive must occupy the upper 3.5-inch drive bay.
The fourth hard drive must occupy the lower 5.25-inch drive bay.
1
Follow the procedures in "Before You Begin" on page 143.
2
Remove the computer cover (see "Removing the Computer Cover" on
page 145).
3
If you are installing a new drive, unpack the drive and prepare it for
installation.
Check the documentation for the drive to verify that it is configured for
your computer.
NOTE: Drive-panel inserts may contain screws on the inside. You can attach the
screws to new drives that do not have any screws.
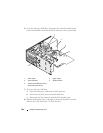
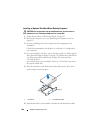
4
If you are installing a new drive
, remove the drive panel (see "Removing the
Drive Panel (Tower Computer)" on page 213) and the drive-panel insert
(see "Removing a Drive-Panel Insert" on page 218) from the lower
5.25-inch drive bay. Use the screws provided with the new drive to install
the drive into the drive bay.
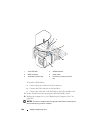
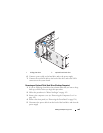
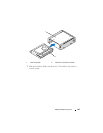
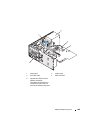
5
Slide the sliding-plate lever and hold it in place as you guide the drive into
the lower 5.25-inch drive bay and gently slide it in until it is securely
seated.