


8D-Link DPR-1260 User Manual
Section 2 - Installation
Chapter 2 - Installation
This section will walk you through the installation process. Placement of the print server is very important. Do not place
the print server in an enclosed area such as a closet or cabinet.
Setting up the DPR-1260
WARNING: Configuration problems may result if the Print Server is powered up without first establishing its network
connection. Follow this procedure to avoid complications at the configuration stage.
1. Confirm proper operation of your printer before connecting the DPR-1260.
2. When you have confirmed proper operation of your USB printer, turn your printer power OFF.
3. Confirm that your network is operating normally.
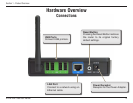
4. Connect the DPR-1260 to your network, using a straight-through CAT5 cable. It is required that an Ethernet cable is
used during initial setup. Once your wireless configuration is set, you may disconnect the Ethernet cable and begin
communicating wirelessly with your DPR-1260.
5. While the printer is powered OFF, use the USB printer cable to connect the DPR-1260 to your USB printer.
6. Switch ON your USB printer.
7. Plug the DC power adapter into the DC 5V power socket on the rear panel of the Print Server.
8. Plug the power adapter into a power outlet. This will supply power to the DPR-1260, as it has no external power
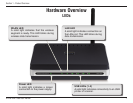
switch. The green Power LED on the Print Server’s front panel should illuminate steadily, and the Print Server’s
Self-Test will proceed.