


DSL-504G ADSL Router User’s Guide
29
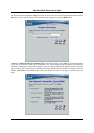
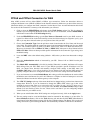
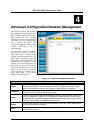
Static IP Address for WAN Connection
When the Router is configured to use Static IP
Address assignment for the WAN connection,
you must manually assign a global IP Address,
Subnet Mask and Gateway IP Address used for
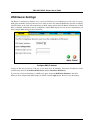
the WAN connection. Most users will also to
configure DNS server IP settings in the DNS
Settings configuration menu (see below). Follow
the instruction below to configure the Router to
use Static IP Address assignment for the WAN
connection.
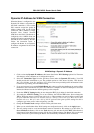
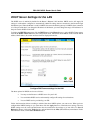
WAN Settings - Static IP
1. Clk to select the Static IP Address radio button listed in the WAN Settings options list. The menu will
change to offer a different set of configuration options.
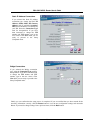
2. Select the Connection Type from the pull-down menu under the Static IP heading. Your ISP should
provide this information to you. The available option are 1483 Routed VC-Mux, 1483 Routerd LLC,
IpoA VC-Mux, IpoA LLC and IpoA (1577). If have not been provided specific information for the
Connection Type setting, leave the default setting.
3. Change the IP Address, Subnet Mask and ISP Gateway Address as instructed by your ISP. Your ISP
should have provided these IP settings to you.
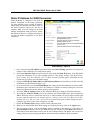
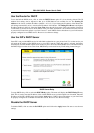
4. If you are instructed to use enable Default Route, this setting specifies that the Router be used to define
the default route to the Internet for your LAN. Whenever a computer on the LAN attempts to access the
Internet, the Router becomes the Internet gateway to the computer.
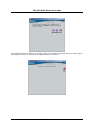
5. Under the ATM VC Setting heading, do not change the PVC (Pvc0) index for the initial connection.
6. Also under the ATM VC Setting, you see two numbers, the VCI and VPI values. Do not change the
VPI or VCI value unless you have been told to do so. These numbers are used to define a unique path
for your connection. Most users in Australia will use a VPI of 8, and a VCI of 35. Most users in New
Zealand will use a VPI of 0, and a VCI of 100. If you have been given specific settings for this to
configure, type in the correct values assigned by your ISP.
7. Change the Virtual Circuit setting to Enabled in the pull-down menu.
8. When you are satisfied that all the WAN settings are configured correctly, click on the Apply button.
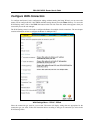
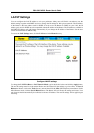
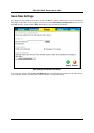
9. The new settings must be saved and the Router must be restarted for the settings to go into effect. To
Save & Reboot the Router, click on the Tools directory tab and then click the Misc (Miscellaneous)
menu button. In the Miscellaneous menu, click he Save & Reboot button. The Router will save the new
settings and restart. Upon restarting the Router will automatically establish the WAN connection.