


Setup 16
Troubleshooting
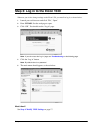
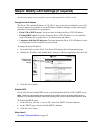
If you cannot access the ‘Log in’ page:
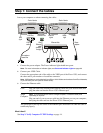
• Verify that the Ethernet cable is connected properly. The green light at the top left of the
Ethernet port should be on (see Ports and Indicator Lights on page 29 for more information).
• Verify that your computer’s TCP/IP settings are configured according to your situation. As
the Eicon 1530’s default IP address is 192.168.1.1, you will not be able to access the web
pages unless your computer is on the same subnet (assigned an IP address that starts with
192.168.1 and is using the same subnet mask).
• Verify that your web browser is configured to use the LAN and not a dial-up connection, and
that your browser is not set to use a proxy server. See Adjusting Browser Settings (below)
for instructions on how to do this.
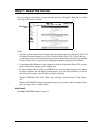
If you cannot access the ‘Log in’ page over a LAN:
• Verify that your computer is on the same physical segment as the Eicon 1530.
• Verify that the Eicon 1530 is the only device on your LAN using the address 192.168.1.1. To
see if this is the case, remove the Eicon 1530 from the LAN, then PING the address
192.168.1.1. If you receive a reply, a device on the LAN already has this address. In this case,
the best solution is to connect the Eicon 1530 to a single computer as described below.
• In general, if you cannot access the ‘Log in’ page, connect the Eicon 1530 to a single computer
for configuration purposes. Later on you can reconnect the Eicon 1530 to the LAN. Note that
a crossover cable (sold separately) is required; the blue cable included with your package will
not work when connecting directly to a single computer.
Adjusting Browser Settings
If you are not able to access the configuration pages, verify your browser settings as described
below. Note that the steps may vary slightly depending on the browser version used.
• Internet Explorer version 5 or later:
– From the ‘Tools’ menu, select ‘Internet Options’, click the ‘Connections’ tab, then click
‘Setup’.
– Select the option ‘I want to set up my Internet connection manually’, then click ‘Next’.
– Select ‘I want to connect through a local area network’, then click ‘Next’.
– Clear all proxy options, then click ‘Next’.
– Clear the option ‘Connect to the Internet immediately’, then click ‘Finish’.
• Internet Explorer previous to version 5:
– From the ‘View’ menu, select ‘Internet Options’, then click the ‘Connection’ tab.
– Verify that ‘Connect to the internet using a local area network’ is enabled.
– Verify that the ‘Proxy Server’ option is disabled.
• Netscape Navigator (do one of the following):
– Under Options, click ‘Network Preferences’, then ‘Proxies’. Verify that the ‘No Proxies’
option is selected.
– Under the ‘Edit’ menu, click ‘Preferences’, ‘Advanced’, then ‘Proxies’. Verify that the
‘Direct Connection to the Internet’ is enabled.
Once finished making changes, click ‘OK’, then retry accessing the web configuration pages.