


Basic Alarm Configuration 4-3
Alarm Configuration
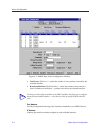
Accessing the Basic Alarm Configuration Window
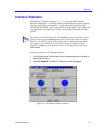
To access the RMON Basic Alarm Configuration window:
1. From the Chassis Logical View, click on the appropriate port index to display
the Port menu.
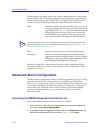
2. Select Alarm Configuration. The RMON Basic Alarm Configuration window,
Figure 4-1 on the following page, will appear.
When the window is first launched, no interfaces will be selected, and the Apply,
Disable, and View Log buttons will be grayed out. Apply and Disable will
activate when an interface is selected; View Log will activate when an interface
which has experienced an alarm event is selected. The presence of an event log is
indicated by the double greater-than sign (>>) displayed to the left of the
threshold value that was crossed.
Viewing Alarm Status
The Basic Alarm Configuration window contains all the fields you need to
configure one or more of the three basic alarms available for each interface
installed in your RMON device:
Kilobits — Total Errors — Broadcasts/Multicasts
Use these fields at the top of the window to change the alarm type displayed in
the list box. For example, if the Kilobits option is selected, the information in the
list box pertains to the status of the Kilobits alarm type for each installed interface.
Before you configure an alarm or alarms, be sure the appropriate option is
selected here.
The available alarm variables are:
• Kilobits (ifInOctets) — tracks the number of octets of data received by the
selected interface. Note that this value has been converted for you from octets
(or bytes) to kilobits (or units of 125 bytes); be sure to enter your thresholds
accordingly. For example, to set a rising threshold of 1250 octets, enter a
threshold value of 10; to set a falling threshold of 625 octets, enter a threshold
value of 5.
TIP
The Basic Alarm Configuration window combines the three parts of creating a working
alarm — configuring the alarm itself, configuring an event that will announce the
occurrence of an alarm (including assigning any actions), and linking the two — into a
single step, and handles the details transparently. For more information about the
individual steps involved in creating an alarm, see Advanced Alarm Configuration, on
page 4-10.