


Hardware Installation
2-2
Mounting on a wall or the ceiling– The access point should be
mounted only to a wall or wood surface that is at least
1/2-inch plywood or its equivalent. To mount the access point
on a wall, or ceiling, always use its wall-mounting bracket.
a. Using the mounting bracket, mark the position of the four
screw holes on the wall or ceiling. For concrete or brick
walls or ceilings, you will need to drill holes and insert
wall plugs for the screws.
b. Position the mounting bracket over the wall or ceiling
screw holes, then insert the included screws and tighten
them down to secure the bracket firmly to the wall.
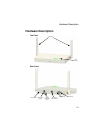
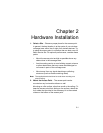
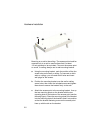
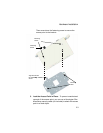
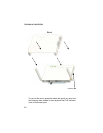
c. Attach the access point to the mounting bracket. Line up
the two mounting points on the bracket with the two
mounting slots on the bottom of the access point (see the
following figure). Place the mounting points of the bracket
into the mounting slots of the bracket, slide it into position
so that the bracket fastening screw on the access point
lines up with the tab on the bracket.