


40 CHAPTER 3: CONFIGURING THE ETHERNET ADAPTER
Changing SNMP
Settings
Under System Configuration, click SNMP to display and change settings
for the Simple Network Management Protocol.
To communicate with the Ethernet Adapter, the SNMP agent must first be
enabled and the Network Management Station must submit a valid
community string for authentication. Select SNMP Enable and enter data
into the fields as described below. When you are finished, click Apply.
Using the Access
Control List
You can use the Access Control List to allow or prohibit access to the
wireless network from Ethernet clients.
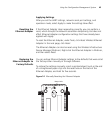
Follow these steps to build the Access Control List:
1 Under System Configuration, click Access Control List.
2 On the Access Control List page, click Add.
The Access Control List New ACL page appears.
3 On the New ACL page, enter the MAC address of the client you want to
add to the Access Control List, select the permission type, and click the
Add button to substantially add it.
4 Repeat steps 2 and 3 for each client.
5 Select the System Default Mode:
■ Allow—allows the client to access the Ethernet Adapter.
■ Deny—prohibits the client from accessing the Ethernet Adapter.
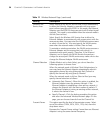
Table 13 SNMP Settings
Setting Description
SNMP Enables or disables SNMP.
Contact Sets the location string that describes the system location.
Maximum length: 255 characters.
Community Name
(Read Only)
Specifies a community string with read-only access.
Authorized management stations are able to retrieve MIB
objects. Maximum length: 23 characters.
Community Name
(Read/Write)
Specifies a community string with read-write access.
Authorized management stations are able to both retrieve
and modify MIB objects. Maximum length: 23 characters.
Trap Destination
IP Address
Enter the IP address of the trap manager that will receive
these messages.
Trap Destination
Community Name
Enter the community name of the trap manager that will
receive these messages.