


General troubleshooting and tips
11
Useful CorelDRAW tips
To ensure CorelDRAW performs at it's best, click on Tools > Options, click on 'snap to objects' and un-tick the 'snap to
objects on (ALT+Z)'. Now click on the + next to 'Text' and click on 'Quick correct'. Un-tick all five boxes.
Depending on your system memory you can increase the memory usage available to CorelDRAW (default 25%). If
CorelDRAW is sluggish and running out of memory try increasing this (10% increments recommended).
To see the actual size of your text in CorelDRAW (rather than font points) activate the 'Transform' toolbar. Click
on 'Window', scroll down to 'Toolbars' and tick 'Transform'. Drag the toolbar to the top and drop it to place it in the
toolbar cluster.
Print quality on ceramics, plastic, metal etc appears weak?
1. Check the time, temperature and pressure as illustrated in the printing information guide.
2. Ensure you have installed the Xpres Subli-Print profile correctly.
3. Check whether the substrate is facing up on the heat press.
4. If you are printing mugs top to bottom ensure you have pressed them for the correct times and temperatures (see
page 10 for more information).
Subli-T hints and tips
• Is the transfer permanent on Subli-T's?
Yes as the process is direct to the polyester.
• When heat applying the press leaves a severe press mark?
The pressure on the heat press is set too high. Reduce the pressure.
Why is the image on mugs blurred after printing?
Ensure you have dipped the mug in water immediately after printing, and/or increase the pressure on the mug press.
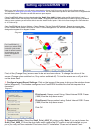
The sublimation transfer colour appears very washed out on the transfer?
All sublimation ink appears weak until heat applied, colours will change and become vibrant.
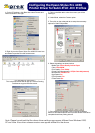
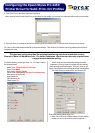
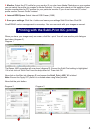
Ensure you have applied the Subli-Print ICC colour correction software. See pages 3-4.
Ensure you are printing onto the correct side of the transfer paper.
For XP4072a/73a & XP4047 Sublimation paper, print onto the bright white side.
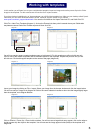
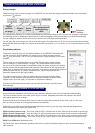
Tips on cropping images
After importing your image into CorelDRAW you may need to crop (down size) the image. There are 2 ways you
can do this.
1. Highlight your image with the pick tool, then click on the shape tool (F10) in CorelDRAW, hold down the CTRL key
then resize you image by moving the selection handles in the corner of the image. Tip: While in the shape tool you can
also add new node and convert the lines to curves.
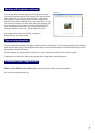
2. If you double click on the image in CorelDRAW it should launch Corel PHOTO-PAINT. Use the crop tool
to achieve similar results as above. CorelDRAW X3 has a crop tool now built in.
Check out the FAQ section on the Xpres website for more hints and tips.
www.xpres.co.uk/tech_support/faq