


CHARGING THE PRINTER WITH INK
Please read this section carefully before proceeding.
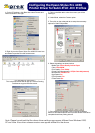
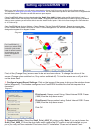
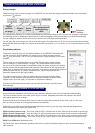
The Epson 4400 is shipped with 4 seperate cartridges. These are listed 1 to 4
in the left hand bay only.
1. Matte Black 2. Cyan 3. Magenta 4. Yellow
Do not insert the original Epson inks into bays 1, 2, 3 and 4. Only insert the Subli-Print
cartridges into these bays.
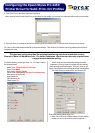
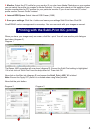
1. Turn the printer on by pressing the power button. After a short time 'NO INK CRTG'
appears on the LCD.
2. Open the ink compartment covers and raise the blue ink levers.
3. Remove the Subli-Print ink cartridge from its pack and then shake ink cartridge
for best results.
4.
The genuine Epson inks supplied with the printer are not required, please store these
with your printers documentation for future use.
Insert the cartridge into the slots using the configuration above, or the ink assignment
guide below. Incorrect installation of cartridge could damage the printer.
5. After inserting all ink cartridges in their corresponding slot, lower the ink levers.
The printer will now start the initial charging.
6. After approximately two minutes, ink lever messages appear on the LCD. Raise
or lower the ink levers accordingly until 'READY' appears on the LCD, which indicates
initial ink charging is completed.
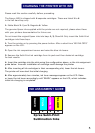
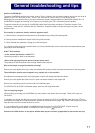
INK ASSIGNMENT GUIDE
1
2
3
4
BLACK
CYAN
MAGENTA
YELLOW
Xpres Subli-Print
Sublimation Inks
5