


Epson PowerLite Pro Cinema 800
6 - Epson PowerLite Pro Cinema 800 11/05
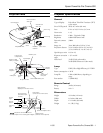
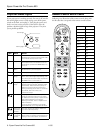
If you press the
Source button on the
projector, you see a menu of available
sources. Press the u or d button to
highlight a source and press the
Select
button.
If you select the Input A source using either
the remote control or the menu above, you
may see the Input A menu:
Press the u or d button to highlight
YCbCr (for component video with an NTSC signal) or YPbPr
(for component video with an HDTV signal), or select
Auto so
the projector can automatically detect the Input A source type.
Then press the
Select button.
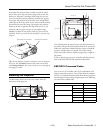
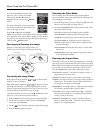
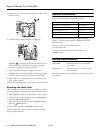
Focusing and Zooming the Image
Sharpen or reduce the focus using the focus ring.
Zoom into or out of the picture using the zoom ring.
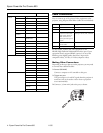
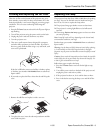
Correcting the Image Shape
If the projected image looks like or , use the Keystone
function to correct its shape.
Note: If the image is shaped like or , the projector has been
placed off to the side of the screen and angled toward it. Face the
projector straight ahead (instead of at the center of the screen), then
use the horizontal lens shift dial to center the image.
To perform keystone correction, press the u or d button on the
projector, or access the menu system as follows:
1. Press the
Menu button on the projector or remote control.
2. Use the menu navigation buttons to open the
Settings
menu, then select
Keystone.
3. Use the arrow buttons to adjust the shape of the image.
4. Press the
Menu button when done.
Choosing the Color Mode
You can change the Color Mode to adjust the brightness,
contrast, and color, letting you quickly optimize the image for
various lighting environments.
1. Select the image source you want to adjust (a different Color
Mode can be saved with each image source).
2. Press the
Color Mode button on the remote control. Then
choose from these settings:
❏
Vivid for projecting the brightest picture available.
❏
Cinema Day for watching movies during the day.
❏
Natural for projecting the most natural, accurate colors.
❏
Cinema Night for watching movies in a dark room.
❏
HD for images that are close to those in professional-use
broadcast monitors.
❏
Silverscreen for black and white movies or those with
dark scenes.
❏
Standard for projecting computer images that conform
to the sRGB color standard.
Choosing the Aspect Ratio
Depending on the port to which your equipment is connected,
your image can be automatically sized to fit on the screen when
Auto is selected as the Aspect setting. If the image doesn’t fit the
way you like, you may need to set the aspect ratio yourself.
Press the
Aspect button, then choose from these settings:
❏
Normal for standard TV broadcasts, computer images, or
images having a 4:3 aspect ratio.
❏
Zoom for images recorded in 16:9 (wide-screen) format.
❏
Wide if you want to expand a 4:3 image to 16:9 so it fills the
whole screen. This stretches only the right and left sides of
the image; the central part is unchanged.
❏
Squeeze for recordings made in a compressed (anamorphic)
16:9 format, sometimes called “Squeeze Mode.”
❏
Through if your image is smaller than 1280 × 720 pixels
and you want to display it at its original pixel size without
resizing it to fit on the screen.
❏
Squeeze Through if your image is recorded in Squeeze
Mode, is smaller than 1280 × 720 pixels, and you want to
display it at its original pixel size.
Wide
Tele
Zoom ring
Focus ring