


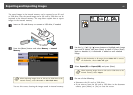
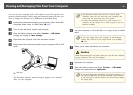

Basic image adjustments such as focus, zoom, and brightness are discussed
in "Displaying a Document or Other Materials" p.25. You can make these
further adjustments by pressing the [Menu] button to open the Image
menu.
a
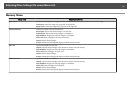
When projecting a live image, you can adjust the Image menu settings.
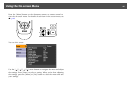
Image Menu
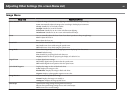
• White Balance
Adjusts the image color based on the lighting in the room where you're
presenting. Select from Auto (to adjust the image automatically),
Cloudy, Daylight, Fluorescent (to lessen blue tones), or Incandescent
(to lessen yellow tones).
• Focus
Lets you manually adjust the focus if auto-focus doesn't produce a sharp
enough image.
• Focus Lock
When On is selected, auto-focus is disabled while zooming.
• Image Mode
You can select from the following settings to adjust for the image type
you are displaying from the camera:
Normal: default setting
Text: for projecting black-and-white text
Display: for directly projecting the display of a tablet device etc.
• Digital Zoom
When On is selected, the digital zoom is enabled after the optical zoom.
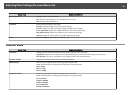
• Color/B&W/Negative
Displays the image in color or black-and-white. To show a photographic
negative in true color, select Negative.
• Image Rotation
Lets you rotate an upside-down image.
• Microscope
Optimizes the brightness, contrast, and other settings for use with a
microscope.
s p.30
• Noise Reduction
When On is selected, noise in the live image is removed. If the delay in
projected images bothers you, select Off.
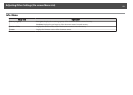
• Advanced
For conducting advanced settings of the live image. Use the [
] and
[
] arrow buttons to adjust the parameters.
• Exposure
If the projected image is too dark or too bright to reproduce the
original colors, you can adjust the light volume. Set Exposure to
a positive value if the overall image is dark and to a negative
value if it is bright.
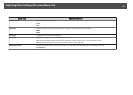
• Contrast
Adjusts the difference between bright and dark areas of images.
Set it to a positive value to project vivid images and to a negative
value to project monotone images.
• Color Adjustment
Adjusts the reddish and bluish colors of the whole image.
• Edge Enhancement
Emphasizes the contours of the image. Set it to a positive value
for sharp images and to a negative value for soft images.
• Gamma
Adjusts the coloring that occurs while displaying the image. When
a smaller value is selected, the dark areas of images become
brighter, but the lighter areas may become over-saturated. When a
larger value is selected, you can reduce the overall brightness of
the image to make the image sharper.
• Reset
Lets you return the image settings to their standard (default) values.
Making Image Adjustments
47