


Logos Imaging EPIX Scanner
User Manual
13
4.3. LOADING THE EPIX DRIVER SOFTWARE
Do not plug in or turn on the EPIX scanner before installing the Logos Imaging software. The
EPIX system drivers are loaded automatically during Logos Software installation.
WARNING: THE EPIX SYSTEM MUST NOT BE INSTALLED ON THE NETWORK
SERVER
4.4. HARDWARE SETUP AND CONNECTIONS
Before you start the hardware setup, ensure that you have an acceptable computer as outlined in
Section 3.4. The computer must have a USB port available.
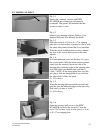
Step 1: Pick a location using the guidelines from 4.1.
Step 2: Set up the computer and monitor per the manufacturer’s recommendations. Use an
ergonomic setup to minimize repetitive motion injuries.
Step 3: Turn the power on to the monitor and computer.
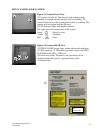
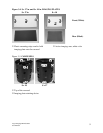
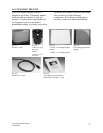
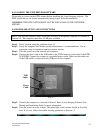
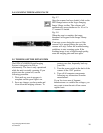
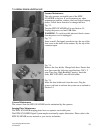
Step 4: Connect the device end of the USB cable to the USB connector on the back of the EPIX
SCANNER. Connect the scanner to a grounded power outlet. Make sure the other end
of the USB cable is connected to the USB port on the computer.
Fig. 4-7
Step 5: Connect the computer to a network if desired. Refer to your Imaging Software User
Manual and Installation Guide for more information.
Step 6: Turn the power on to the scanner. The green light on the scanner should be lit at this
time. If it is not, follow the trouble shooting guidelines in Section 7.3.
USB
Cable
Power
Cable