


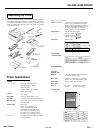


EPL-6000 LASER PRINTER
If the message remains, the drum unit and the drum replacement
cartridge must be replaced. See the section on replacing the drum
unit in Chapter 6.
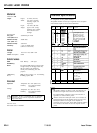
COVER OPEN
The printer cover is open. Close the cover and press the ON LINE
button to set the printer on line and begin normal printing.
ERROR 20
Not enough memory is available. Press the RESET/CONTINUE button
to continue printing. Your page may be printed as two or more
separate pages. This error can also be cleared by turning the printer
off and back on again. It may be necessary to simplify your print job
by downloading a smaller font, deleting some macros, or using a
lower resolution. You may also wish to purchase the optional 2MB
memory board available for this printer.
ERROR 21
The page is too complex to print. Press the RESET/CONTINUE button
to eject the page and clear the error. This error can also be cleared by
turning the printer off and back on again. Before you continue
printing, simplify the page you are trying to print
ERROR 22
The buffer has overflowed due to a communication protocol error.
Make sure that your SelecType settings match the communication
protocol settings of your computer. If the problem persists, contact
your authorized Epson dealer for service.
ERROR 40
A parity or baud rate error has occurred. Press the RESET/CONTINUE
button to clear the error. Make sure your SelecType settings match
your computer configuration. If the problem persists, contact your
authorized Epson dealer for service.
FONT CART ERROR
The font cartridge selected using the FONT SOURCE SelecType
option is not installed properly. Turn the power off. Then remove
the cartridge and reinsert it. Turn the power back on and resend the
print job. If the problem persists, make sure that the correct FONT
SOURCE option has been selected in SelecType. See the section on
SelecType in Chapter 3 for details.
INSERTION ERROR
There is a paper feeding problem. See the section on paper jams in
this chapter for details.
PAPER EMPTY
There is no paper in the paper cassette or the paper cassette is not
installed properly. Load more paper into the paper cassette or
properly install the cassette. See Chapter 4 for details.
PAPER JAM
Paper is jammed inside the printer. See the section on paper jams in
this chapter.
Note:
If the printer was recently transported, the paper feed
mechanism may need to be aligned. See the section on setting the
paper feed mechanism in Chapter 1 for details.
PAPER SIZE ERROR
If you press the ON LINE button to override the PS CHANGE
message, this message appears as your print job ejects to remind
you to change the paper and SelecType PAPER SIZE option. See
PS CHANGE below.
PS CHANGE
Your application software has requested a paper size that does not
match your SelecType setting or paper. Press the RESET/CONTINUE
button to clear the error; the printer is set off line.
Note: If you are using a non-standard paper size (one that is not
listed on the PAPER SIZE
menu in the SelecType), manual
feeding may be necessary. gee Chapter 4 for details.
After clearing the error, you have two options:
1.
Change the paper in thecassette; then enter SelecType and
change the paper size to match. Press the ON LINE button after
exiting SelecType to continue printing.
2
Alternatively, press the ON LINE button to continue printing on
the current paper. (The message PAPER SIZE ERROR appears
in the display.) Sea PAPER SIZE ERROR above.
TONER EMPTY
The developer unit may not be installed properly. Open the printer
and make sure the developer unit is seated properly in the basket
If the message remains, the toner is low and you must replace the
toner cartridge. See the section on replacing the toner cartridge in
Chapter 6.
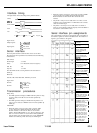
CPU ERROR
ERROR 30
ERROR 10
ERROR 31
ERROR 11
ERROR 32
ERROR 12 ERROR 33
If one of these error messages appears, follow the steps below.
1.
Press the RESET/CONTINUE button
2 If the error does not clear, turn the printer off for at least five
seconds. Then turn it back on.
3.
If the problem remains, service is required. If you need service,
contact an authorized Epson dealer. If you need assistance
locating a dealer, call the Epson Consumer Information Center at
1-800-922-8911 for the location of the nearest Epson dealer.
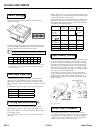
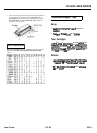
Routine Cleaning
It is necessary to clean certain printer components regularly to
ensure optimal print quality. Cleaning should be performed
whenever the drum unit or toner cartridge is replaced. You should
also clean the components listed below If you are having problems
with print quality, as discussed in Chapter 7.
Cleaning schedule
The toner cartridge is replaced about every 1,500 pages, and the
drum unit is replaced every 10,000 pages. Bach time you replace one
of these components, you should clean the following items:
l
Transfer charger wire and discharge wire
l Paper guide
l Basket
l Laser beam lens.
Note: You should also clean each of these items if you are having
print quality problems, as discussed in Chapter 7.
(When replacing the drum, you should also clean the main charger
wire on the new drum unit, as described in the section on replacing
the drum unit.)
WARNING: You should turn off your printer and
disconnect the power cord before cleaning your printer.
Laser Printers
7/18/89 EPL-7