


72
Appendix A: Connecting to Additional Equipment
Installing the Projector
The projector can be installed for three different viewing setups: front
projection, ceiling mounting, or rear projection onto a
semi-transparent screen.
To project from overhead, you’ll need to select
Ceiling
in the
projector’s Advanced menu. To project from the rear, select
Rear
Proj
. See page 48 for more information.
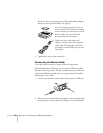
If you’re ceiling-mounting the projector and you place it above screen
level, you’ll have to tilt it down to position the image on-screen. This
causes the image to lose its rectangular shape. You can then correct the
distortion by using the
Keystone
function in the projector’s menu
system (see page 46).
If you place the projector’s lens so it’s level with the top of the screen,
the image will be rectangular and you won’t have to adjust it. If you
place the lens lower than the top of the screen, you’ll have to tilt the
projector upward if you want to fill the whole screen with the image.
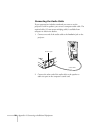
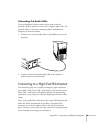
Connecting to an External Audio System
The projector’s internal speaker is loud enough for most rooms.
However, if your installation requires maximum volume and sound
quality, you can connect the projector to external speakers or a public
address (PA) system. If you’ve connected a computer and video
source, the projector will automatically switch the audio whenever you
switch sources (see page 30).
To connect the projector to an external sound system, you will need
an RCA-to-3.5 mm stereo audio cable, which may be included with
your sound system, or may be purchased from an electronics store.