


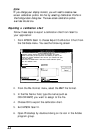


Note:
If
you change your display monitor, you will need to create a new
screen
calibration profile. Do this by selecting Calibration Profile in
the Configuration dialog box. The new screen calibration profile
overrides the old
one.
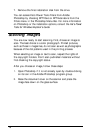
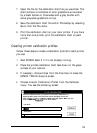
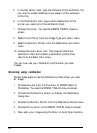
Exporting a calibration chart
Follow these steps to export a calibration chart from Scan! to
your application:
1.
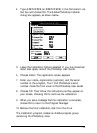
From EPSON Scan! II, choose
Export Calibration Chart
from
the Calibrate menu. You see the following screen:
This function calibrates your
*cannerlapplicatlor\lprinter
system by passing a
calibration sample through each stage and analyzing the results.
Select a file format you can import into the software you plan to use.
Import the resulting Calibration Chart file into your software and print
it on your printer.
Then return to EPSON Scan! II and select ‘Create Calibration profile .
..I
from the ‘Calibrate’ menu.
File Name:
lam
EIll
Eile
Form&
/*I
Qirectories:
Driyes:
=
c: ms-dos
5
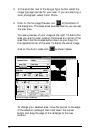
2.
From the
File Format
menu, select the BMP file format.
3.
In the
File Name
field, type the name (such as
COLORl.BMP) you want to assign to the file.
4.
Choose
OK
to export the calibration chart.
5.
Exit EPSON Scan! II.
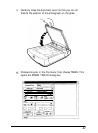
6.
Open Photoshop by double-clicking on its icon in the Adobe
program group.