


7.
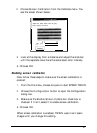
Open the file for the calibration chart file you exported. The
chart contains nine blocks of color gradations surrounded
by a black border on three sides and a gray border with
some grayscale gradations on top.
8.
Save the calibration chart file within Photoshop by selecting
Save
from the File menu.
9.
Print the calibration chart on your color printer. If you have
more than one printer, print the calibration chart on each
printer.
Creating printer calibration profiles
Follow these steps to create a calibration profile for each printer
you use:
1.
Start EPSON Scan! II if it is not already running.
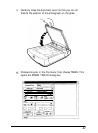
2.
Place the printed calibration chart face down on the glass
surface of your scanner.
3.
If necessary, choose
Close
from the File menu to close the
EPSON TWAIN Acquire screen.
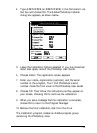
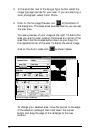
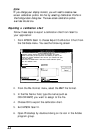
4.
Choose
Create Calibration Profile
from the Calibrate
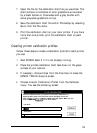
menu. You see the following screen:
Place the Calibration Chart you printed in the scanner. Make sure it is
aligned properly. Enter a file name and a short description for the file.
After you click’Continue’.the Epson TWAIN dialog will appear. Make sure it is
set for Calibration.
Finally,click
on the ‘Scan’ button.
File Name:
Description:
Your Printer
23