


12 13
How to use Preferences
There are 10 user-selectable options you
can customize on your 9500ci. The
buttons labeled VOL and BRT on the
controller are used to enter Preferences.
Once you enter Preferences, the VOL
button is used to REVIEW your current
choices, and BRT button is used to
CHANGE settings. See Pages 14-16 for
more detail.
How to use Preferences
1 To enter Preferences, press and
hold both the VOL and BRT buttons
down for 2 seconds. (The unit will display
the word
Prefs, accompanied by a voice
announcement).
2 Press the VOL button to review the
current settings. (You can either tap the
button to change from item to item, or hold
the button to scroll through the items).
3 Press the BRT button to change any
setting. (You can either tap the button to
change from setting to setting, or hold the
button to scroll through all the options).
4 To exit Preferences, simply wait 8
seconds without pressing any button,
or press the PWR button
(
). (The unit
will display
Complete, accompanied by a
voice announcement).
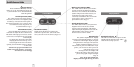
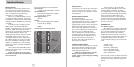
An example
Here is how you would turn the AutoMute
feature off.
1 Enter Preferences by holding both the
VOL and BRT buttons down for 2 seconds.
The 9500ci will beep twice and display
Prefs.
2 Then hold the VOL/RVW button down.
The 9500ci will scroll through the categories,
starting with
Pilot, GPS, aLearn, Meter,
then
AutoMute.
3 Release the VOL/RVW button when the
9500ci shows the AutoMute item. Since the
factory setting for AutoMute is on, the display
will show aMute ON.
(If you accidentally don’t release the VOL/
RVW button in time, and 9500ci goes to the
next category, simply hold the VOL /RVW
button down again, the 9500ci will scroll
through all of the categories.)
4 Press the BRT/CHG button to change
from
aMute ON to aMute OFF.
5 To exit Preferences, simply wait 8
seconds without pressing any button, or
press the PWR button
(
). The 9500ci will
display
Complete, accompanied by a voice
announcement.
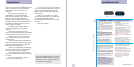
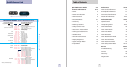
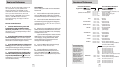
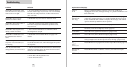
Overview of Preferences
Press the VOL button
to go from one category
to the next
PILOT
(Power-on indication)
GPS
AUTOLEARN
SPEED ALERT
METER
AUTOMUTE
UNITS
VOICE
BANDS
MARKERS
* Factory Default Settings
To reset 9500ci to its
original factory
settings, press and
hold the “VOL” and
“SENS” buttons
while turning the
power on. The
9500ci’s display will
provide a Reset
message, accompa-
nied by an audible
alert, acknowl-
edging the reset.
Pilot HWY
Pilot H
Pilot H.>
Pilot V
Pilot SPD
GPS ON
GPS
OFF
aLrn ON
aLrn OFF
sAlrt ON
sAlrt OFF
Meter STD
Meter EXP
Meter SPC
aMute ON
aMute OFF
Units ENG
Units MET
Voice ON
Voice OFF
Bands DFT
Bands MOD
X ON
or OFF (default is on)
K ON or OFF (default is on)
Ka ON or OFF (default is on)
POP ON or OFF (default is off)
SWS ON or OFF (default is off)
LSR RECV or SHFT or OFF (default is RECV)
Mark DFT
Mark MOD
rCam ON
or OFF (default is on )
sCam ON or OFF (default is on)
Trap ON or OFF (default is on)
Othr ON or OFF (default is on)
Press the BRT/CHG button
to change your setting
within a category
* Full word: Highway, AutoScan, etc.
Letter: H, A, ANX
Letter, with scanning dot
Vehicle voltage
Vehicle speed
* GPS On
GPS Off
* AutoLearn On
AutoLearn Off
* Speed Alert On
Speed Alert Off
* Bar-graph Meter
Expert Meter
Spec Display
* AutoMute On
AutoMute Off
* Units English
Units Metric
* Voice Alerts On
Voice Alerts Off
* Factory Default Settings
Factory Default Settings Modified
Turn bands ON or Off by
pressing the MUTE button
* Factory Default Settings
Factory Default Settings Modified