PS 124 12 VDC, 4 Amp Power Supply • Installation Manual
13
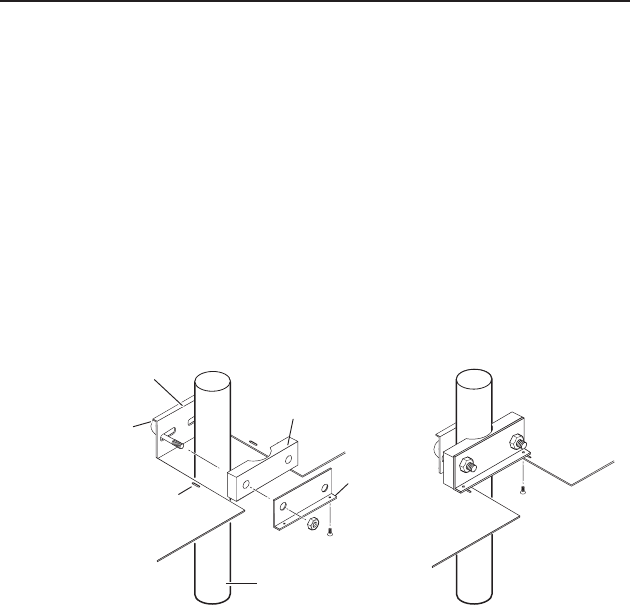
5. AssembletheU-boltandthefollowingpartsinorder:
a. PassthelegsoftheU-boltthroughtheslottedholeson
the mount plate flange.
b. Placethelegsaroundtheceilingpole.
c. Passthelegsthroughtheholesinthecontouredbase.
N
The pole fits snugly into the depression in the center of
the contoured base.
d. PassthelegsthroughtheholesintheL-shapedbracket.
N
The bracket slots can accommodate 1.0" to 2.0" diameter
poles. The supplied square U‑bolt fits 1.5" to 2.0"
diameter poles. If a smaller diameter pole is used, obtain
the proper size square U‑bolt locally.
U-bolt
Slotted Hole
in PMK Tray
L-shaped
Bracket
L-shaped
Bracket Screws
Contoured
Base
Ceiling
Pole
Mount Plate
Flange
Figure 12 — Projector mounting the PS 124
6. AlignthetwoslottedholesinthebottomoftheL-shaped
bracketwiththetwoslottedholesinthebaseofthe
tray.SecuretheL-brackettothebasebyinsertingtwo
6-32x5/16"screws(provided)throughthealignedslots.
7. MovethePMK350tothedesiredlocationontheceiling
pole, as close to the ceiling as desired.
8. SecuretheL-shapedbrackettotheU-boltusingthe
includedhexnuts,washers,andlockwashers.Tightenthe
hexnutssecurely.
C
A socket wrench is recommended to tighten the
hex nuts so the PMK 350 does not slide down the
ceiling pole.
9. Securethefrontpaneltothemountingtraywithfourof
theincluded#6screws.
10. If desired, apply one of the cover sheets to the underside of
themountingtray(gure11).


