


YCS SW2 • Installation and Operation
Installation and Operation, cont’d
2-8
YCS SW2 • Installation and Operation
2-9
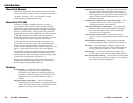
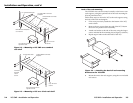
Extron
PMK 250
Projector Mount Kit
Extron
Power Supply
Plastic Tie
Mounted
Extron Product
Cover Sheet
Front Plate
Rubber Pad
U-bolt
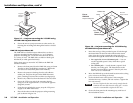
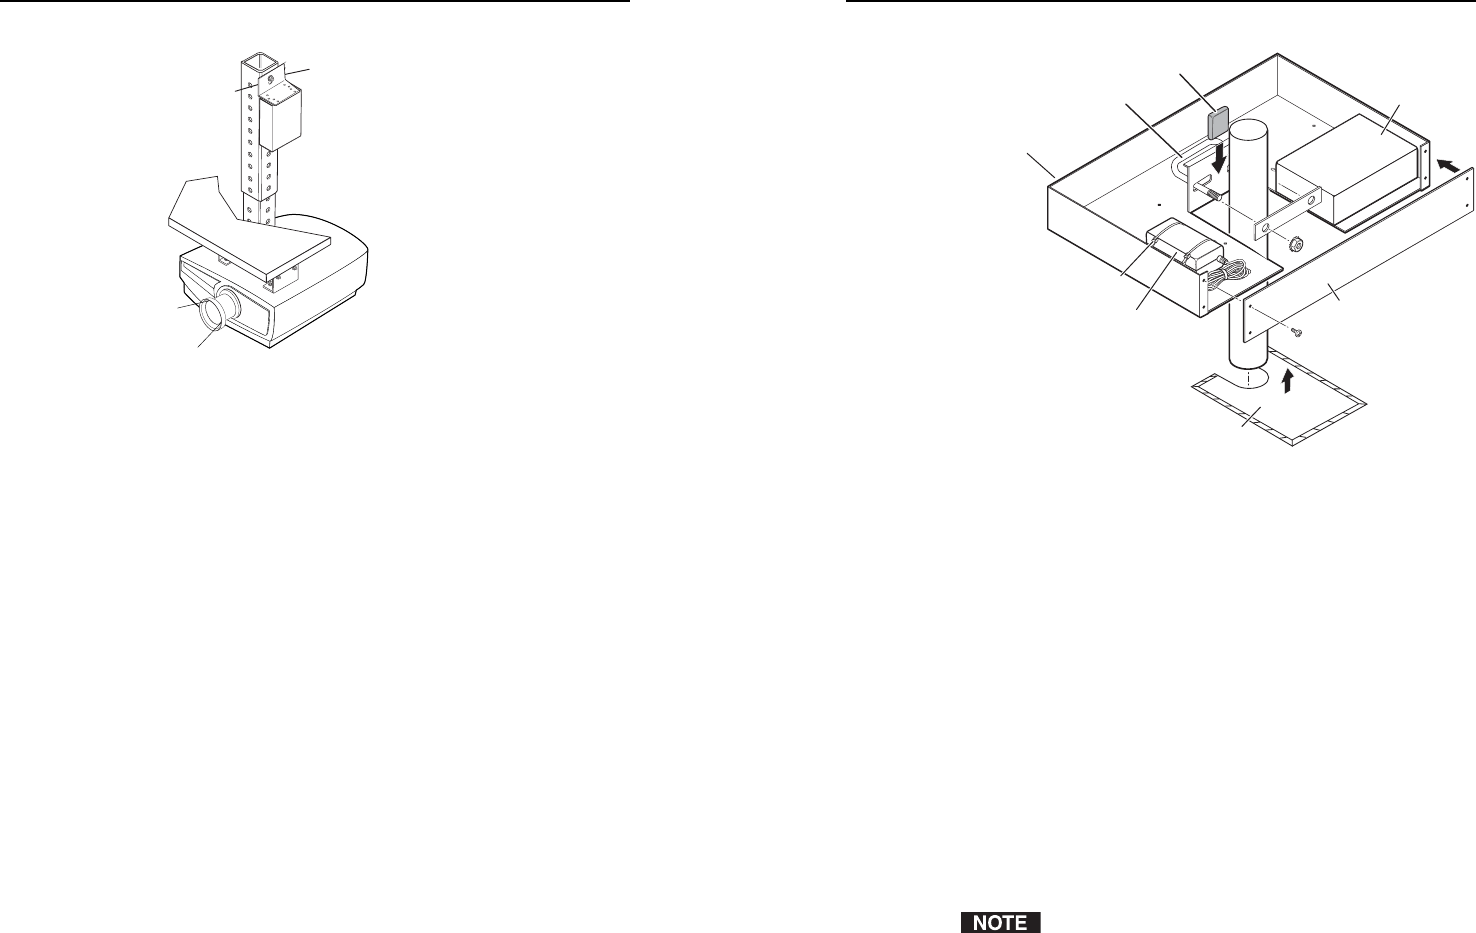
Figure 2-8 — Projector-mounting the YCS SW2 using
the PMK 250 Projector Mount Kit
7. Insert the two legs of the provided square U-bolt through
the slotted holes on the back side of the bracket mount
plate, place the two legs around the ceiling pole, then
insert them through the round holes on the backing brace.
• For a typical (1.5” to 2.0” diameter) pole — You can
use the supplied square U-bolt, which fi ts a typical
ceiling pole.
• For a smaller pole — Locally obtain a square U-bolt
that fi ts your ceiling pole. The slotted holes on the
bracket can accomodate a square U-bolt for pole sizes
from 1.0” to 2.0” in diameter.
8. Move the PMK 250 up to the desired location on the ceiling
pole, as close to the ceiling as desired.
9. Secure the back brace to the square U-bolt using the
included hex nuts, washers, and lock washers. Tighten the
hex nuts securely.
Be sure to tighten the hex nuts securely enough that the
PMK 250 does not slide down the ceiling pole. A socket
wrench is recommended to tighten the hex nuts.
10. Secure the front panel to the mounting tray with four of
the included #6 screws.
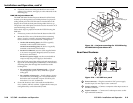
Ceiling
Projector
Projector
Mounting
Bracket
Mounting
Bolt
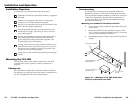
Figure 2-7 — Projector-mounting the YCS SW2 using
the PMK 100 Projector Mount kit
4. Secure the unit to a projector mount or other surface by
inserting the mounting bolt through the bracket’s slotted
hole.
PMK 250 Projector Mount Kit
The PMK 250 Low Profi le Projector Mount Kit is an above-
projector mounting kit that attaches to a 1” to 2” diameter
projector mounting pole. It can hold more than one device,
in a variety of sizes. The PMK 250 is available in black (part
#70-526-02) or white (part #70-526-03).
Follow these steps to mount the YCS SW2 on the PMK 250
bracket as follows:
1. Remove the front panel from the PMK 250, using an Extron
Tweeker or other small Philips screwdriver. (Retain the
four screws to reattach the plate when fi nished.)
2. Remove the protective backing from the self-adhesive
rubber pad, and place the pad on the PMK 250 mount
plate, centering it between the two holes (see fi gure 2-8).
3. Remove any rubber feet from the bottom of the YCS SW2.
4. Secure the YCS to one side of the mounting bracket,
using two of the supplied 4-40 x 3/16 screws in opposite
(diagonal) corners.
5. Using the two included tie wraps, strap the YCS power
supply to the PMK 250 bracket.
6. Place the bracket around the projector ceiling mounting
pole as shown in fi gure 2-8.