


54 01-28006-0024-20041026 Fortinet Inc.
Configuring FortiGate units for HA using the CLI High availability installation
To configure a FortiGate unit for HA operation
1 Go to System > Config > HA.
2 Select High Availability.
3 Select the mode.
4 Select a Group ID for the HA cluster.
5 If required, change the Unit Priority.
6 If required, select Override master.
7 Enter and confirm a password for the HA cluster.
8 If you are configuring Active-Active HA, select a schedule.
9 Select Apply.
The FortiGate unit negotiates to establish an HA cluster. When you select apply you
may temporarily lose connectivity with the FortiGate unit as the negotiation takes
place.
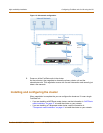
10 If you are configuring a NAT/Route mode cluster, power off the FortiGate unit and
then repeat this procedure for all the FortiGate units in the cluster. Once all of the units
are configured, continue with “Connecting the cluster to your networks” on page 55.
11 If you are configuring a Transparent mode cluster, reconnect to the web-based
manager.
You may have to wait a few minutes before you can reconnect.
12 Go to System > Status.
13 Select Change to Transparent Mode and select OK to switch the FortiGate unit to
Transparent mode.
14 Allow the FortiGate unit to restart in Transparent mode and then power off the
FortiGate unit.
15 Repeat this procedure for all of the FortiGate units in the cluster.
16 Once all units are configured, continue with “Connecting the cluster to your networks”
on page 55.
Configuring FortiGate units for HA using the CLI
Use the following procedure to configure each FortiGate unit for HA operation.
To change the FortiGate unit host name
1 Power on the FortiGate unit to be configured.
2 Connect to the CLI.
See “Connecting to the command line interface (CLI)” on page 17.
3 Change the host name.
config system global
set hostname <name_str>
end