


Foundry FastIron LS Layer 2 Compact Switch Hardware Installation Guide
3 - 16 © 2007 Foundry Networks, Inc. September 2007
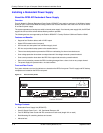
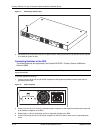
Powering On the System
After you complete the physical installation of the system, you can power on the system.
1. Remove the power cord from the shipping package.
2. Attach the AC power cable to the AC connector on the rear panel.
3. Insert the power cable plug into a 115V/120V outlet.
NOTE: To turn the system off, simply unplug the power cord or cords.
NOTE: The socket should be installed near the equipment and should be easily accessible.
NOTE: If the outlet is not rated 115/120V, stop and get the appropriate cable for the outlet.
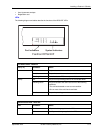
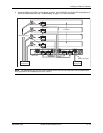
Verifying Proper Operation
After you have installed a redundant power supply, verify that the device is working properly by plugging it into a
power source and verifying that it passes the self test.
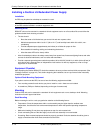
1. Connect the power cord supplied with the device to the power connector on the power supply on the rear of
the device.
2. Insert the other end into a properly grounded electrical outlet.
NOTE: The devices do not have power switches. They power on when you connect a power cord to the
device and to a power source.
If your installation requires a different power cord than that supplied with the device, make sure you obtain a
power cord displaying the mark of the safety agency that defines the regulations for power cords in your
country. The mark is your assurance that the power cord can be used safely with the device.
3. Verify that the LED for the power supply is green.
4. Verify proper operation by observing the LEDs:
All of the port LEDs should flash momentarily, usually in sequence, while the device performs diagnostics.
After the diagnostics are complete, the LEDs will be dark except for those that are attached by cables to other
devices. If the links on these cables are good and the device has power, the link LEDs will light.
For more details on specific LED conditions after system start-up, see the section, “LEDs” on page 3-9 and
“Hardware Specifications” on page 2-1.
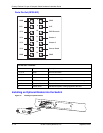
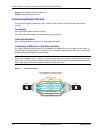
Attaching a PC or Terminal
To assign an IP address, you must have access to the Command Line Interface (CLI). The CLI is a text-based
interface that can be accessed through a direct serial connection to the device and through Telnet connections.
The CLI is described in detail in the Foundry FastIron X Series Configuration Guide.
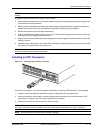
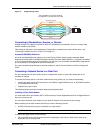
You need to assign an IP address using the CLI. You can access the CLI by attaching a serial cable to the
Console port. After you assign an IP address, you can access the system through Telnet, the Web management
interface, or IronView Network Manager.
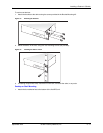
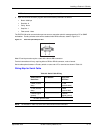
To attach a management station using the serial port:
1. Connect a PC or terminal to the serial port of the system using a straight-through cable. The serial port has a
male DB-9 connector.