


GD Systems
Page - 4 Windmill
5.0 Using Windmill Software
5.1 Defining a new system.
In order to create a new system click on the ‘create new’ button. The screen will display blank panel and
device information as shown in figure 5.2. To change the settings go to section 5.4
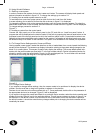
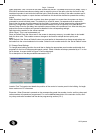
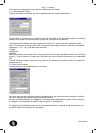
5.2 Loading from an earlier system stored on a disk
To load data from a previous system saved on disk click on the ‘Load from disk’ button.
A screen allowing you to select a file from the disk as shown in figure 5.1 is displayed.
To change the directory click on the appropriate buttons until the correct directory appears. To select the
desired file double click on the file name. Data will load and a screen similar to Figure 5.2 will be displayed.
To change settings proceed to section 5.4
Figure 5.1
5.3 Loading a system from the control panel.
Connect the front panel port of the control panel to the PC and click on ‘Load from panel’ button. A
progress bar will be displayed as the data is loaded. If this fails try pressing the internal reset button on the
processor board of the control panel and re-click the ‘load from panel’ button. Care should be taken to es-
tablish that the cause and effects are the same for the system in all panels as individual panels may oper-
ate different relays in an alarm or fault condition.This option is not available for the module port at present.
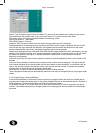
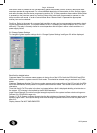
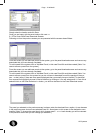
5.4 To Change Device Settings and/or Cause and Effects
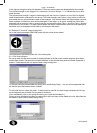
Having created a new system, loaded the data from a disk or loaded data from a control panel the following
screen will be displayed. This screen may display information relating to the system being changed or be
blank if it is a new system. This screen is used to only display the settings. The screen details panel infor-
mation with the panel number pre-fixed with ‘P’ in the unit number column. Device information can be dis-
played by scrolling past the panel details. Panels 1 to 50 are displayed first. To scroll either click and hold
on the scroll bar or drag the drag bar to the appropriate position.
Figure 5.2
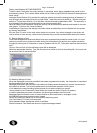
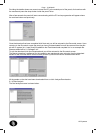
5.4.1 Change Device Settings
If you require to change device settings, then the screen needs to be positioned to display the device
number. Use the scroll bar or drag bar to position to selector to the devices.
Devices do not have the unit number prefixed with a ‘P’. Once positioned, double click on the parameter of
the appropriate device to be changed. Figure 5.3 will be displayed
If you require to change the cause and effects for a particular device number, select the device number and
double click on the ‘Special’ row for the particular device. This will cause a screen as shown in figure 5.3 to
be displayed. If the device number is not correct then the up and down arrows can be used to reposition
the device number. It should be noted that any changes made prior to changing the device number will au-
tomatically be saved.