


Setup Wizard
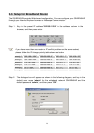
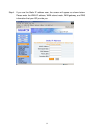
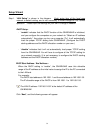
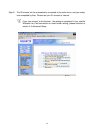
Step1. “LAN Setup” is shown in the diagram. Each setup item of the local area
network is default setting, and is not necessary to make change to it for normal
operation. Please input the settings on your own if change is needed.
DHCP Setup:
- ”enable” indicates that the DHCP function of the GN-BR404W is initialized,
and you configure the computers on your network to “Obtain an IP address
automatically”, then when you turn your computer “On”, it will automatically
load the proper TCP/IP setting from GN-BR404W. (Configure the DHCP
starting address and the DHCP allocation number on your own.)
- “disable” indicates that it will not automatically load proper TCP/IP setting
from the GN-BR404W. You will have to configure all the TCP/IP setting for
your network manually. (It is not necessary to configure the DHCP starting
address and the DHCP allocation number.)
DHCP Start Address / End Address :
When the DHCP setting is “enable”, the GN-BR404W uses this allocable
range of the IP address as the initial value to assign the IP to the PC connected
to the LAN end.
For example:
The DHCP start address is 192.168.1.1 and the end address is 192.168.1.50 .
The IP allocable range of the DHCP is from 192.168.1.1 to 192.168.1.50.
The LAN IP address “192.168.1.254” is the default IP address of the
GN-BR404W.
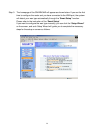
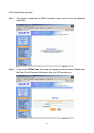
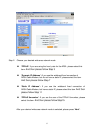
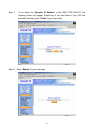
Click “Next”, and the following screen will appear:
36